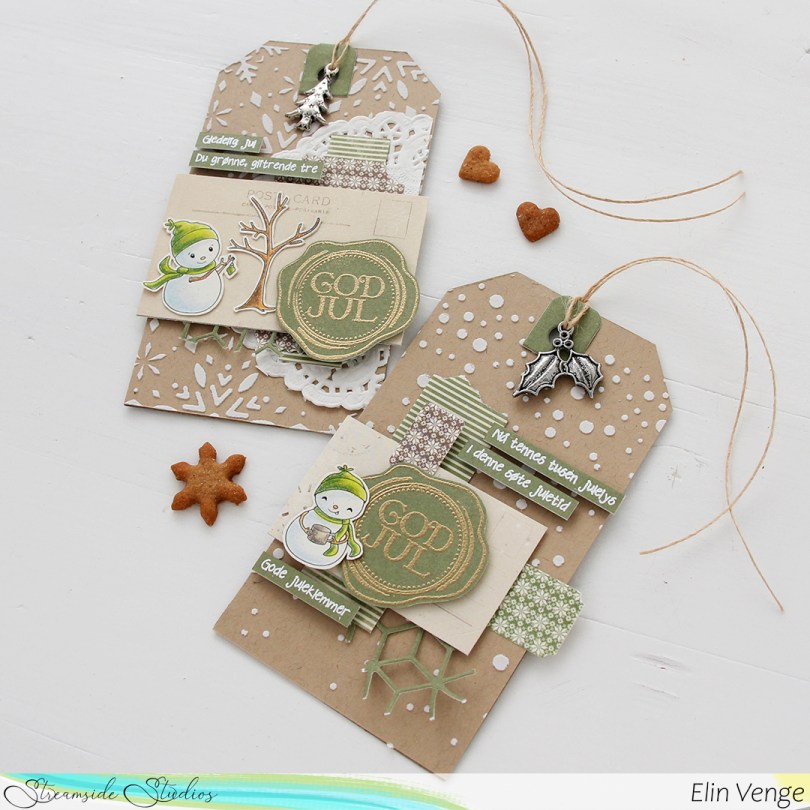
Hi, crafty friends! Brace yourselves for a text heavy post. Every year, I seem to make more than enough Christmas cards to send out, but I always scramble last minute to get gift tags done. Not this year, I’ve made quite a few, and here are a couple more, featuring snowmen from the Snow Much Fun digi stamp set from Streamside Studios.
 For these tags (I’ll have more to share later), I did compartmental crafting. Tim Holtz always raves about this, but I usually sit down and create my cards from start to finish in one sitting. Actually, that’s not entirely true, I do prefer coloring one day and making the rest of the card another day. Coloring takes a while, and once I’m done with that, I’m not really in actual making and assembly mode.
For these tags I did things a little differently. I colored lots of snowmen at once using my Prismacolor Premier pencils. I usually use my Copics, they’re so much faster, but for this I wanted a less bright look, and printed my snowmen onto Rustic White cardstock from Papertrey Ink. In another crafty session, I used various stencils with different pastes to create textured backgrounds, which I later cut down to tags. For these two I used the Falling Snow slimline stencil from Simon Says Stamp and the Snowflakes stencil from Ciao Bella, both using Light & Fluffy Modeling Paste from The Crafter’s Workshop onto Classic Kraft cardstock from Papertrey Ink. Both of these stencils are fairly large, so I got several tags out of each of the backgrounds I created.
In yet another crafty session I stamped and heat embossed a bunch of different small sentiments from Norsk Stempelblad AS, as well as a god jul seal from Poppydesign, the seals in Gilded embossing powder from Brutus Monroe and the sentiments in White super fine detail embossing powder from Ranger. I used green cardstock from the Christmas in Norway collection from Pion Design, which is an older collection, and it was a great opportunity to shrink my pile of scraps a little bit. Most of the patterned paper pieces I’ve used for these tags are from the same collection, with a few being even older. I used my Happy Days Ticket Stubs die from XCut to create the small pieces that I clustered together. This is the same die I pretty much always use for my clusters on my cards. It’s one die that cuts out nine tickets, and it’s my favorite die to use for my scraps. They don’t look like scraps when they’re die cut. I also just cut some strips using my trimmer and tore the edges for an uneven look, and used a die from Altenew to create small die cut pieces of solid color to tuck behind my other elements to break up all the perpendicular angles a bit.
I used foam tape on some of my elements, but not all, and die cut a reinforcer from green cardstock using a die from My Favorite Things. To finish off I tied May Arts natural twine through the holes and added a charm to each of the tags.
 For the back of the tags I used a tag die from My Favorite Things to die cut from more of that Classic Kraft cardstock from Papertrey Ink. I die cut a bunch of tags in one session, so I’d have many to do at once when I did the actual assembly. I stamped an older Inkido stamp using Jalapeño Popper ink from My Favorite Things, and even did some second generation stamping. I also used a couple of stamps from the Distressed Patterns stamp set from MFT to add additional spatter beyond the 24.12 stamp. I used more of the scraps I die cut and cut with my trimmer, and stamped a to/from stamp from Inkido onto scraps of Pion Design patterned paper using Dark Chocolate ink from Papertrey Ink. First generation stamping on one, second generation on the other for a softer look. It was fun to break out acrylic blocks to use with my stamps again, I use my Misti for pretty much everything, but this didn’t have to be perfect or straight, so I just played and had fun!
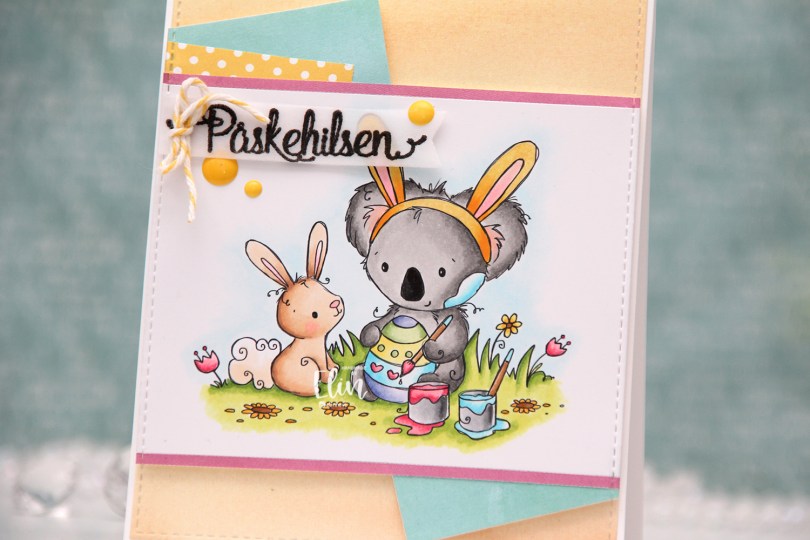
 Isn’t this image the cutest? The koala with the bunny ears painting the egg with the little bunny watching, it’s sooo sweet. I colored this image using a lot more colors than I normally would, but they’re colors that scream spring to me, so I’m all for it, I definitely long for warmer days.
 I put a strip of pink patterned paper from My Favorite Things above and below the image, and added a few more patterned paper pieces (from Lawn Fawn and My Favorite Things) angled behind my colored piece, before die cutting all of them using the A2 Stitched Rectangles STAX 1 die set from My Favorite Things to create that faux stitch look that I love to add to my cards. I used the same die to die cut from yellow patterned paper from Lawn Fawn, adhered that to my card base, then mounted my colored piece on top using foam tape.
 Onto a piece of vellum, I stamped a sentiment from an Easter stamp set from Papirdesign (PD18390 Påske) using VersaFine Onyx Black ink and clear heat embossed it, before die cutting it using one of the dies in the Fishtail Flag Frames die set from My Favorite Things.
 I tied a bow around my sentiment banner using twine from Whisker Graphics in the color Lemon, and then I finished off the card with a few yellow enamel dots from the Pocketful of Sunshine enamel dot collection from Altenew.
 Lots of colors for this one.
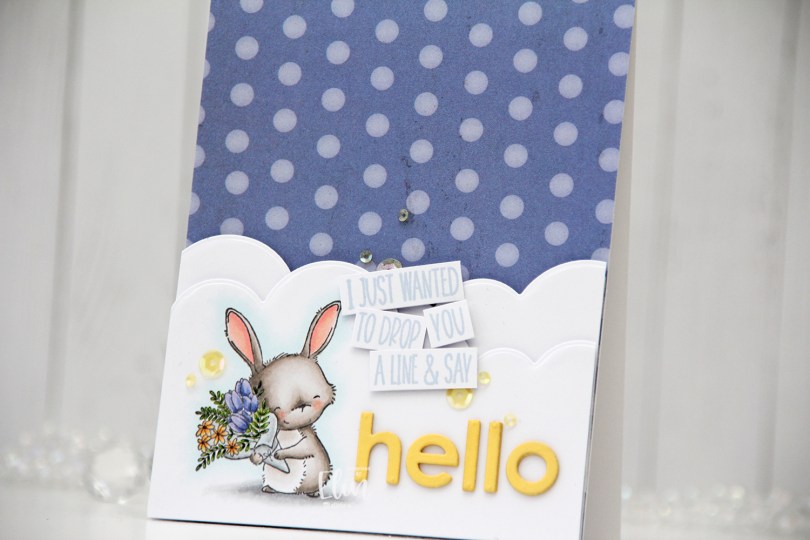
 I stamped the image using Extreme Black ink from My Favorite Things, before coloring with my Copics. I love love love the way rubber stamps stamp even the thinnest lines. It’s great for details, and Stacey Yacula’s illustration style gets to shine. Her line work is very delicate, which pairs so well with rubber stamping, because you’re able to easily stamp all the little details.
 I used a die in the Slim Card Basics die set from Mama Elephant to create a cloud border above my stamped and colored image, and used the same die on a separate piece of cardstock. I found a scrap piece of patterned paper from Scenic Route that I added to my card base, then added my cloud pieces on top using foam tape.
 I used two sentiments from the
  Using the lower case Parker alphabet die set from Memory Box, I die cut each letter three times from Harvest Gold cardstock from Papertrey Ink to spell the word hello. I stacked my die cuts and adhered them to the right of Junie using liquid glue.
 To finish the card I added a few yellow sequins from Little Things from Lucy’s Cards. These are actually from the Candy Corn mix; a Halloween mix with orange, yellow and clear sequins and gems which even has a few tiny ghosts made from acetate thrown in. It’s a fun mix.
 Simple color palette for this one.
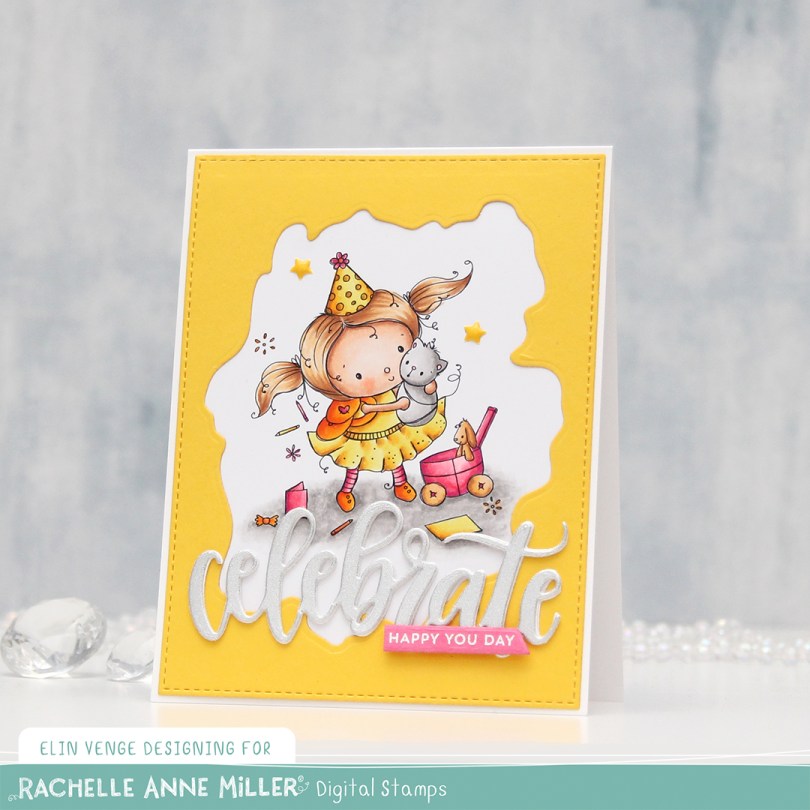
 I colored my image with Copics and put it aside while I worked on the rest of the card, which I kept fairly simple. I used the largest die in the A2 Stitched Rectangles STAX 1 set from My Favorite Things in combination with the Watercolor Wash Free Form die, also from MFT, to die cut a window from Bright Buttercup cardstock from Papertrey Ink. I adhered the image to the back of this window and adhered it to my card base, which I made from Stamper’s Select White cardstock from Papertrey Ink.
 I die cut the Celebrate die from My Favorite Things twice from white cardstock and once from a silver sparkle cardstock and adhered them together for dimension. I also stamped a sub sentiment from the Itty Bitty Birthday stamp set from My Favorite Things onto Hibiscus Burst cardstock from Papertrey Ink and heat embossed it, before using a banner die from the Everyday Gift Box die set from My Favorite Things. I put a couple of additional layers of pink cardstock behind it, adhered it on top of the stacked Celebrate die cut and embellished the card very simply by putting two star enamel dots in spots that have stars in the stamp. Simple, right?
 Quick and easy coloring with a fun, summery color palette (it’s been snowing and sleeting and freezing here, which makes me long for summer even more than usual).
 I printed the image near the bottom left corner of a panel of X-Press It blending card, before coloring it with Copics and using the largest die in the A2 Double Stitched Rectangle STAX die set from My Favorite Things to create a finished look with the nice faux stitching details that I love to add to my cards. I adhered it to a cardbase I created from Jalapeño Popper cardstock, also from MFT, and I had my base ready for some play with scraps.
 I love creating these clusters of die cut scraps on my cards, and I have stamp storage pockets with little die cut patterned paper scraps sorted by color. That way I can rummage through these when I create my cards instead of having to find lots of patterned paper to match my card, then die cut it. It usually takes several different patterned papers of one color to create the dynamic look I want for my cards, but for this one, I actually kept it simple with one yellow (P13), one white and gray (Sunny Studio) and only two green ones (Basic Grey and Karen Foster Design). They’re all different shapes, which still keeps it interesting. Some are glued directly to the card, some with foam tape for a little bit of dimension. Using VersaMark ink, I stamped a sentiment from the Mini Messages stamp set from Mama Elephant onto one of these die cut pieces (it happened to be a tag) and heat embossed it using Super Fine Detail embossing powder from Ranger. I used part of a mini paper doily from Doodlebug Design behind my main cluster, and added a few enamel dots (green from Papirdesign, yellow from Altenew) to embellish.
 Lots of green for this color palette.
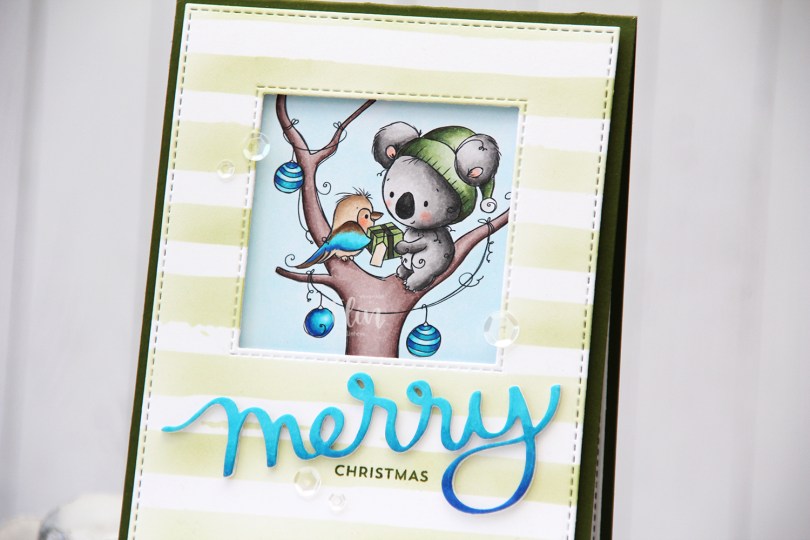
 I colored the cute little scene with Copics and put it aside while I worked on the rest of my card. On a separate piece of X-Press It blending card I blended the same three blueish teal colors that I used for the kookaburra and the ornaments to create an ombré effect, and used the Merry Script die from Mama Elephant to create part of a sentiment that would match my coloring. I added three white die cuts behind it for dimension to make it stand out on my card.
 I used the largest die in the A2 Stitched Rectangles STAX 2 set from My Favorite Things along with the Selfie Square die, also from MFT, and die cut both from a piece of Stamper’s Select White cardstock from Papertrey Ink. I then used the Watercolor Stripes stencil from Altenew and ink blended Jalapeño Popper ink from MFT very softly onto the white cardstock for a subtle background.
 I put foam tape behind my ink blended background and adhered everything to a cardbase I created from Jalapeño Popper cardstock from MFT, before scattering a few sequins from the White Orchid Sequin Mix from Little Things from Lucy’s Cards to finish my card. I used the stencil from Altenew to add a little interest to the envelope, as well.
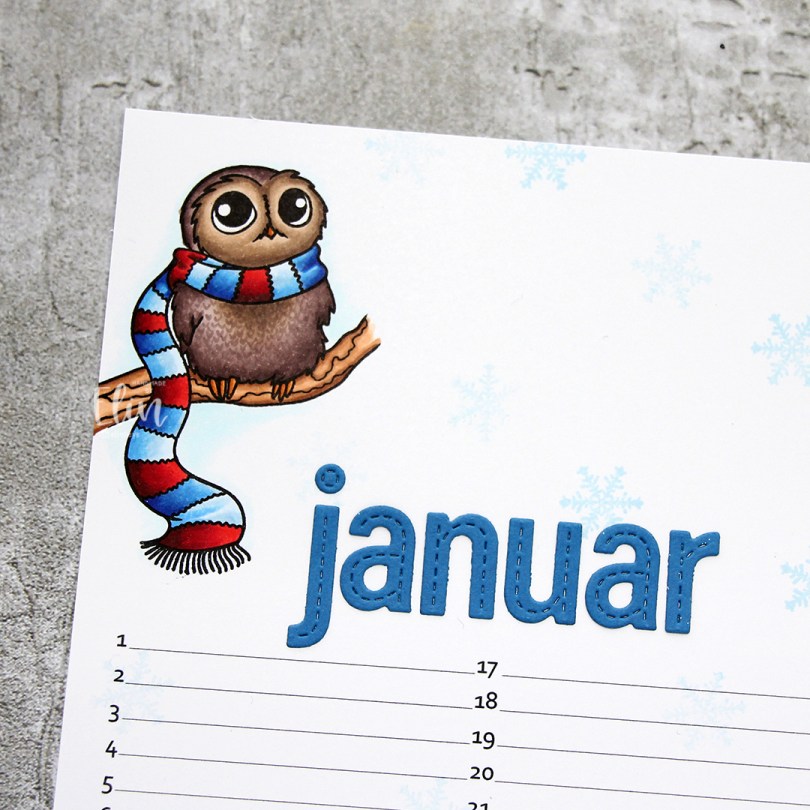

 I stamped the snowflake in the stamp set repeatedly across my background using Iceberg ink from Altenew. I did second generation stamping on some of the snowflakes, especially where they overlap the lines where I intend to write. From Cornflower cardstock from My Favorite Things, I die cut the letters to spell januar using the In Stitches Lowercase Alphabet die set, also from My Favorite Things. I adhered the letters using liquid glue, centering them above the dates for the month.
 I used lots of colors for this little owl. Isn’t he just the cutest, sitting there on his branch wrapped in a scarf?
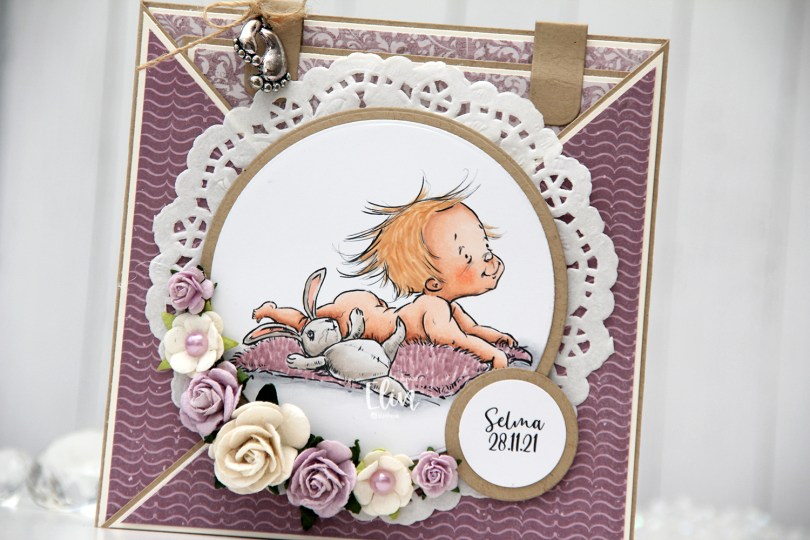
 This card was created for a little girl whose christening was this past Sunday. I think the
  I die cut the image using a circle die from Lifestyle Crafts and matted it with kraft cardstock. I also printed the name and date on a piece of white cardstock that I also matted with kraft. I put a doily from Helz Cuppelditch behind my image and added flowers using a hot glue gun. I took out the yellow centers of two of the flowers and replaced them with Lavender pearls from Kaisercraft.
 On the inside tag I added a circle diecut made from white cardstock for a space to write a personal message. I used the Labels Trio die set from Spellbinders to create two “handles” from kraft cardstock. I tied a bow and attached a charm to one of them for a little added interest.
 On the back of the card I stamped a sentiment from North Star Design using Amethyst ink from Altenew.
 The card isn’t very big, it only measures 5×5″, but it’s quite dimensional and doesn’t fit in a regular envelope, so I decided it was best to create a box envelope.
 I rummaged through my 12×12″ cardstock and found a color that matched pretty well, and used my Envelope Punch Board from We R Memory Keepers to create the box. I added another Helz Cuppelditch doily for cohesion, as well as more of the patterned paper that I die cut using the Impact alphabet die set from My Favorite Things.
 The process for creating this one was identical to the first ones I shared in
  There’s lots of texture and visual interest on this tag because of all the layers of paper, the foam tape to add dimension and the stenciled background. The accessories on the snowman are in a brighter green color than everything else on the tag, which still makes him stand out against the other elements.
 For the back of the tag I used a couple of stamps from Inkido, as well as more of the white heat embossed sentiments from Norsk Stempelblad that I created lots of in one of my compartmental crafty sessions. These tags were heaps of fun to put together like this.
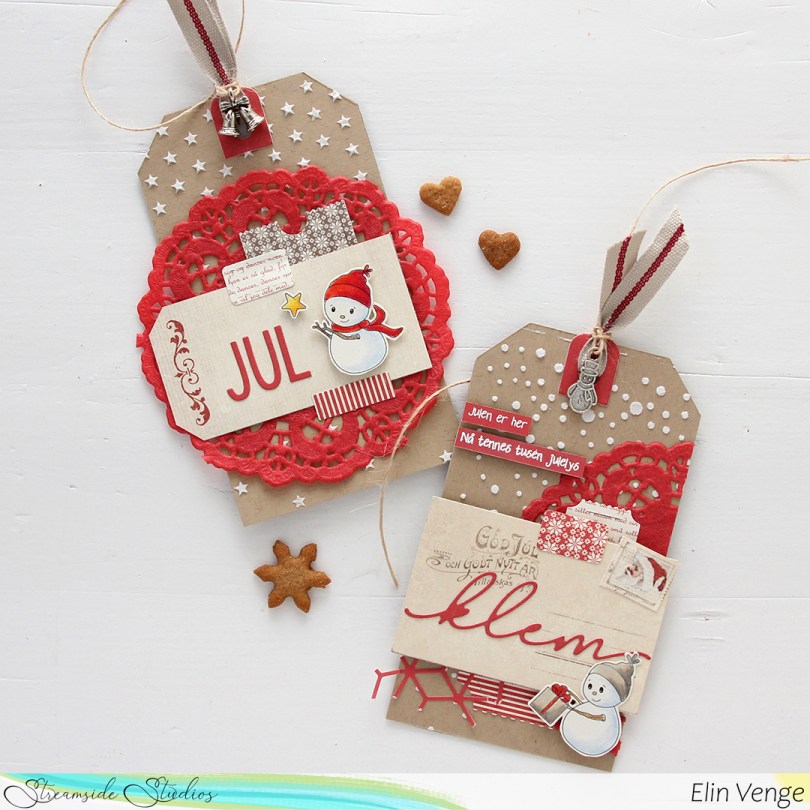
 For these tags, I chose red instead of green. I planned ahead and colored some of the snowmen with green accessories, and some with red. For one of these tags I used the Falling Stars stencil from Simon Says Stamp, and I thought it was fitting to add the snowman with the star for that particular tag.
 A lot of elements are the same on these two tags as the first two; patterned paper from Pion Design die cut using the Happy Days Ticket Stubs die from XCut. I also used the same die from Altenew that I used with the green cardstock on this one, and it’s a nice added element that doesn’t have the perpendicular angles than many of the other layers do, so it breaks up the monotony a little and adds interest. For the tag with the stars, I used the word JUL from the Gledelig jul die from Kort & Godt, and for the tag with the Christmas present, I used the word klem from the Juleklem die, also from Kort & Godt. I added red paper doilies from Papirdesign to the base of these tags, it’s a nice foundation to put everything else on top of.
 The backs of these are pretty similar to the backs of the green tags I made. I used the same 24.12 stamp from Inkido and the same stamps from the Distressed Patterns stamp set from My Favorite Things, but changed the ink color to Pure Poppy ink from Papertrey Ink.