Hi, everyone! Today’s blog post is a long one with lots of photos of lots of cards, so I suggest you get comfortable 🙂
 I’m starting with a baby card. I made quite a few baby cards from this one sheet. Usually I make A2 size cards, but this image is so big that the card actually measures 5 x 8 1/2″. I used a knife and a pair of scissors to cut my image, keeping a thin white border along the edge.
 I ran a piece of white cardstock through my Gemini Jr. using an embossing folder from We R Memory Keepers. The result is a background with a little bit of interest, while still keeping the image in focus. I used foam tape to add my dry embossed pane to my card base and some 1 mm foam tape from Rayher on the back of my image for a tiny bit of extra dimension. I also used 1 mm foam squares to add the sentiment strips to the balloon, and finished off the card with some sequins and crystals from Little Things from Lucy’s Cards.
 The embossing folder I used is 6 x 6″. Since my panel was taller, I had to run it through from both ends. Along the seam I added a strip from another sheet of patterned paper from the same collection. The strip hides the seam and also acts as an anchor for the balloon image.
 My goal was to use every little bit of the images on the one sheet, so I glued the left over branches to the inside of the card.

This is the sheet of patterned paper I’ve used for all my cards. It’s called Cuddles and is part of the Little Treasures collection by Kaisercraft.
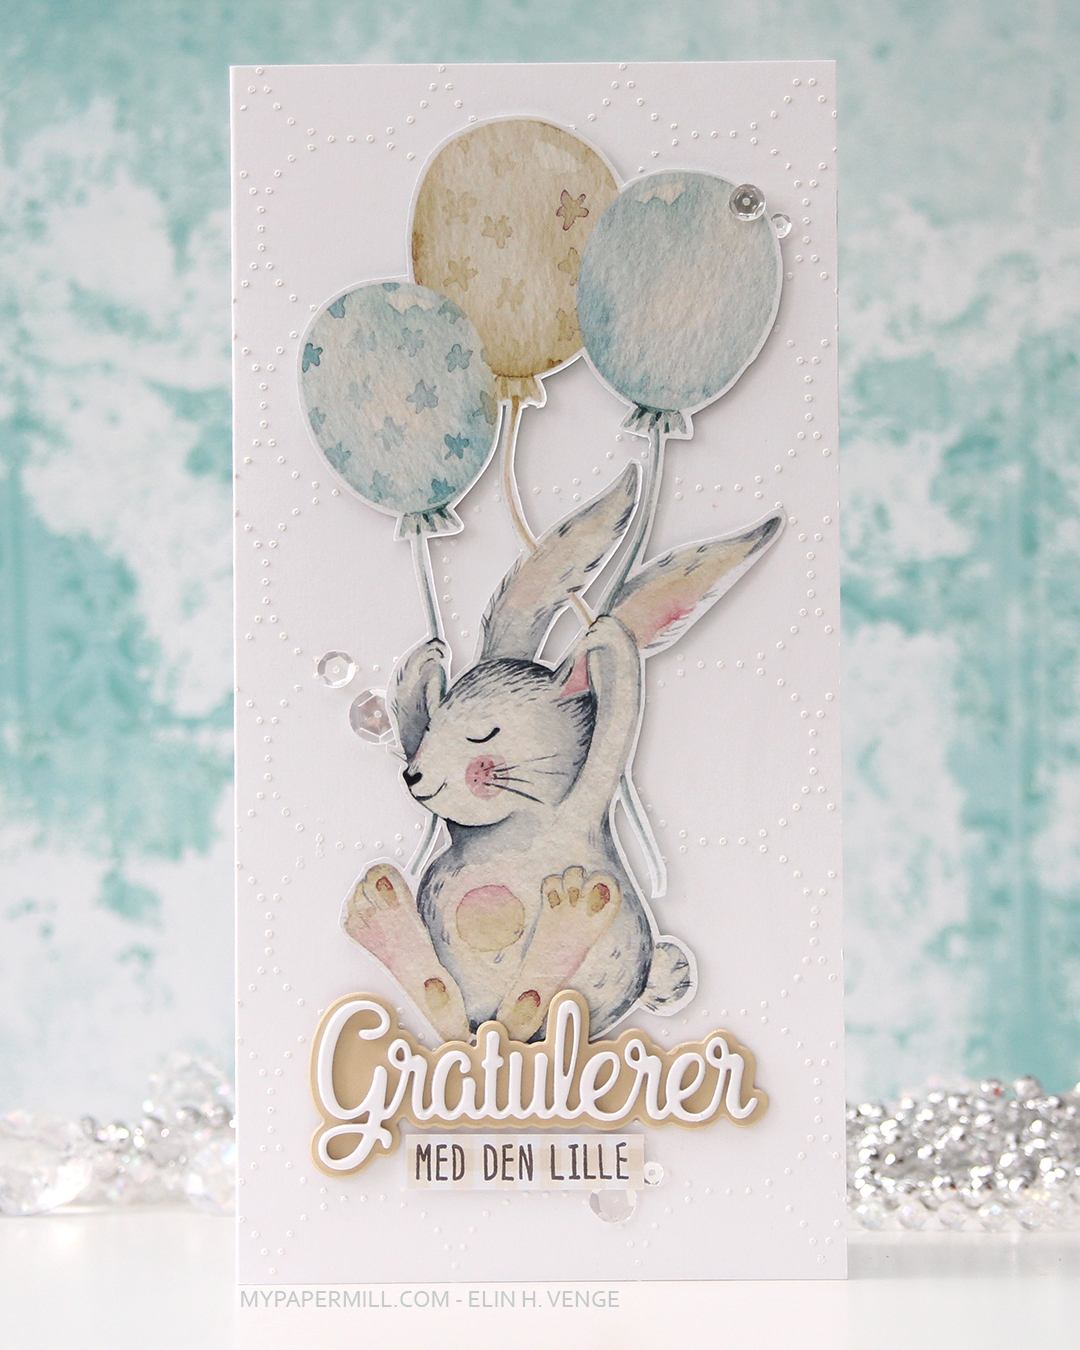
 My second card is along the same lines as the first one. I used the bunny in the pink hot air balloon and the stars that are scattered around the paper on this one. This card is a little more narrow, measuring 4 1/4 x 8 1/2″. On the background I used cloud stencil from My Favorite Things and Distress Oxide in the color Tumbled Glass to create some interest in the background without overshadowing my focal point. This time I glued the image straight to the cardbase using foam tape. I also used foam tape behind some of the stars, while others are glued down using liquid glue.
 I used a Papirdesign die set to diecut the word babyjente (baby girl). I diecut the shadow twice in vellum and the actual word several times using white cardstock. I put a few layers behind the vellum, making it look like the vellum is floating, and the rest of the layers on top of the vellum. Diecuts really pop when they’re layered like this.
 Even though the card is simple, all the dimension makes it a little bit interesting anyway.
 I glued on some sequins from Little Things from Lucy’s Cards on this one too. The leftover stars I glued to the inside of the card.
 My next card is a simple birthday card. I’ve gone back to my regular A2 size with this one. I used the largest of the dies in the Stitched Rectangles STAX 2 set from My Favorite Things and used an embossing folder from We R Memory Keepers to create a little bit of interest to my background. I glued the panel straight onto my pink card front, with no dimension this time.
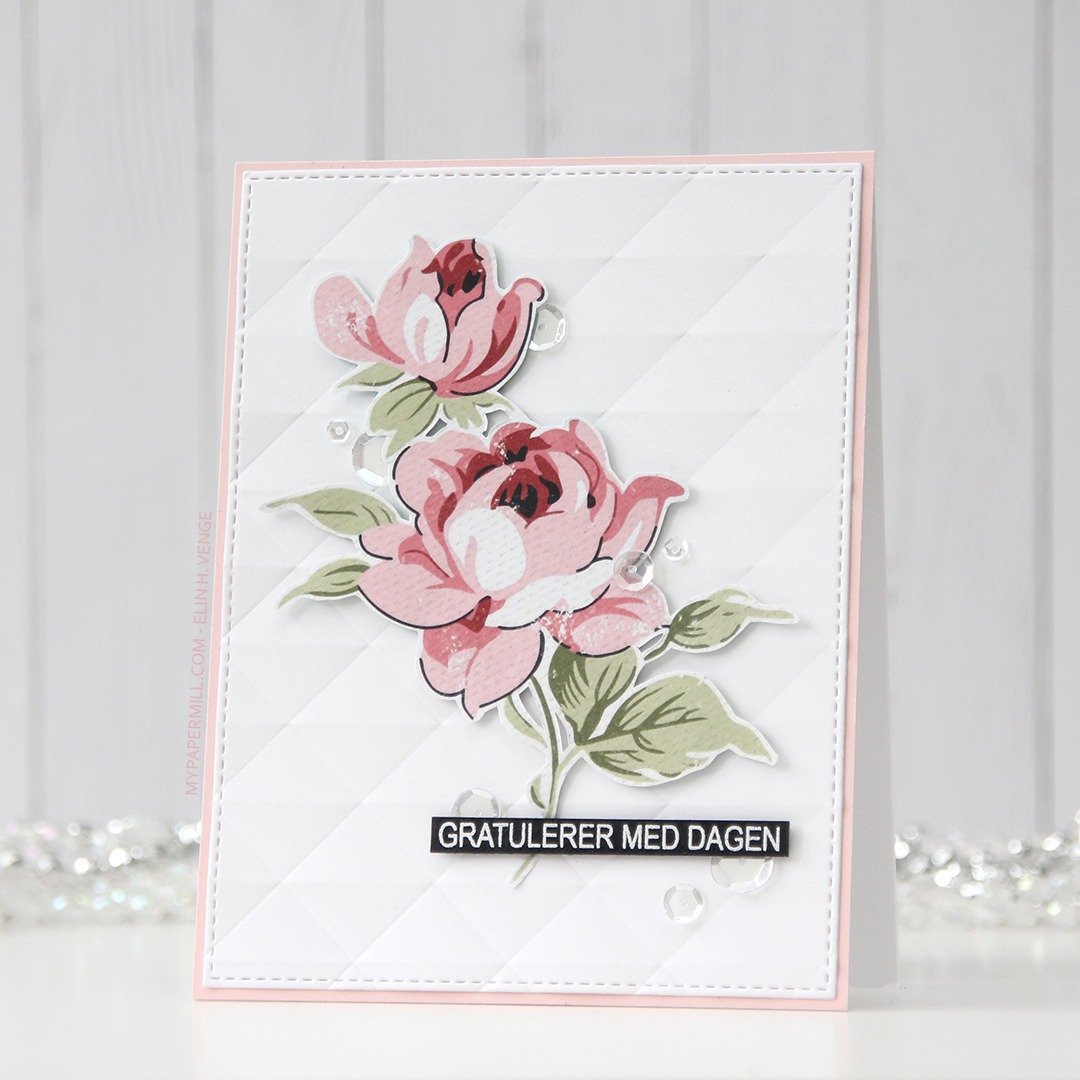 I used 1 mm foam squares to glue my fussy cut flower to the front of the card. I stamped and white heat embossed a sentiment from Mathia design on a strip of black cardstock and used foam tape to attach it to the card over the stem of the rose.
 I finished off my card by gluing on some Pretty Pink Posh sequins in a sort of visual path from the bottom of the card near the sentiment all the way to the top rose. I always glue small embellishments like this close to other elements on my cards, it creates a better visual effect than gluing them far from everything else.
 Card number four is a very different kind of card for me. When I started the process of making these cards I drew sketches for each card. The sketch for this one was for a portrait orientation, but when I actually started making this one I realized that the image was a landscape orientation, so I had to flip my sketch and change things around a bit. This image is quite large, so this is an A7 (5×7″) card. I had two sheets of the patterned paper, so I used the back of the second one to create my frame, and glued it to my cardbase using foam tape.
 I added the flowers to my cardbase using foam squares.
 I wasn’t sure what to do for a sentiment since I had to turn my sketch 90 degrees and make changes to it. The idea I had for the portrait orientation didn’t translate to a landscape orientation. In the end I chose to put my sentiment in the bottom left of my card. That’s not a spot I usually use for my sentiment, but on this card I thought it was the best placement. The sentiment itself is a veneer piece from Rayher that I embossed using four layers of white embossing powder, glued straight to my flowers and frame using liquid glue.
 A few Pretty Pink Posh sequins around the sentiment finished off this card.
 My next card is another baby card. A square one, measuring 4 1/4 x 4 1/4″. No white border around the fussy cut bunnies, simply because the tip of the tail on the largest bunny intersects with a rose bud on the patterned paper, making me have to cut a little bit off his tail. Once that was done, I decided it would be best to cut right up to the edge of the rest of the bunnies as well.
 The background paper I used on this card is part of the Little Gem sheet, so is the sentiment I used. I diecut an eyelet circle using a Cottage Cutz die and added it in the center of my card using foam tape. I added the bunnies with 1 mm Rayher foam suares, and did the same with the sentiment, staggering it.
 I finished off the card with some matte gold sequins from Little Things from Lucy’s Cards. As usual when I add sequins to my cards, I glued them on near the sentiment. There’s another yellow bunny on the sheet of patterned paper, I fussy cut that one and glued it on the inside of the card.
 The next card is a slimline card. I used a Memory Box stencil with some acrylic paste from Kreul to make a little bit of interest to the background, once again making sure it still remains a background element.
 I glued the bunny to the cardbase with 1 mm foam squares and diecut Gratulerer (Congratulations) from Papirdesign multiple times from white cardstock, then glued them to a shadow made from colored cardstock (Fine Linen from Papertrey Ink). The stamped sub sentiment is from a Papirdesign stamp set (100 år), stamped in Memento Espresso Truffle ink on the bottom strip of the patterned paper. I added it with some foam tape below the diecut.
 I finished the card by adding sequins from Pretty Pink Posh in a visual triangle. They’re all in close proximity to the sentiment and the bunny. Some of them glued on top of other elements, some of them tucked behind.
 My next card is another regular A2 size card. I covered the cardbase using the same sheet of paper I used on the square card, only the reverse side. The small flowers are from that main sheet I’ve used throughout each of the cards in this blog post. These flowers were on the edge of the sheet, so they’re flat on one side, so I had to put them along an edge. I figured that this polaroid frame from My Favorite Things was perfect.
 I made a white, dry embossed background on this card also and mounted it using foam tape. It makes the background a little less busy, and the little flowers I fussy cut a little more prominant. I stamped a sentiment from fra Mathia design onto the patterned paper and used it as my “photo” in the polaroid frame, which I created from several layers of white cardstock that I stacked on top of each other. Here you can also see a little bit of the inside of the card, as well, where I glued the flowers that didn’t fit on the front of the card. I was determined to use every single image from that one sheet of patterned paper.
 I embellished with sequins from Pretty Pink Posh. This time in two clusters near the flowers to keep the focus on them and not so much the sentiment in the center.
 The final card. I wasn’t entirely sure what to do with this one. The feathers were the only images remaining from that one sheet, and I didn’t know how to use them in a good way and turn them into a nice card until I realized I could make a background from them. There was only one turquoise feather on the page, so I fussy cut the turquoise feather from the second sheet to get a good balance of color between all the feathers.
 Embossing folder on white cardstock once again, and I created a pretty wide margin on the outside with this one. I usually like my margins fairly narrow, but I think this turned out good. I added my feathers to the dry embossed panel using 1 mm foam squares, cut off the excess and used those bits to cover the empty spots left behind in the corners.
 The sentiment is from a stamp set from Mathia design, stamped in black on a white cardstock strip. The turquoise strip behind it is from that other sheet of patterned paper that I’ve used here and there in the course of these eight cards. There’s a sentiment in white on that strip, but the strip I glued on top started and ended between words on the turquoise one, so only the turquoise is showing, I was really lucky that way. I finished off my card with some Pretty Pink Posh Sequins. This time I glued some near the sentiment and scattered a few others tucked between some of the feathers.
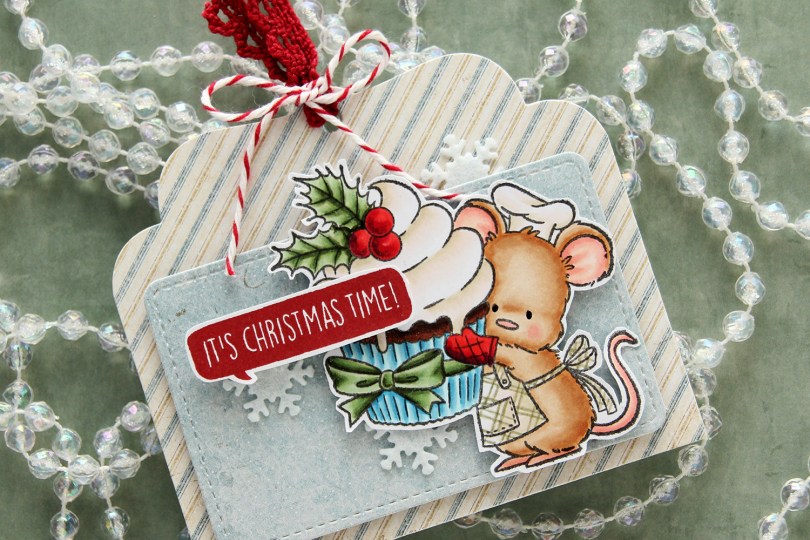
 I colored up the cute little mouse with Copics, adding a plaid pattern to the apron using a Zig watercolor brush marker (No. 98 Pale Dawn Gray), before fussy cutting the image leaving a white border. I used the Gift Pocket Tag die set from Mama Elephant to die cut from patterned paper from the Christmas Nostalgia collection from Maja Design to create my tag. I mounted the smaller piece with foam squares and did the same with the cute little mouse.
 I stamped a sentiment from the Holiday Blurbs I stamp set from Purple Onion Designs using Amarena Cherry ink from My Favorite Things, fussy cut leaving a white border and mounted it on top of my image, doubling up on the foam squares on the left half. I tucked a few felt snowflakes from Kort & Godt under my element, added a bit of black glaze pen to the eyes and tied ribbon and twine at the top of the tag to finish.
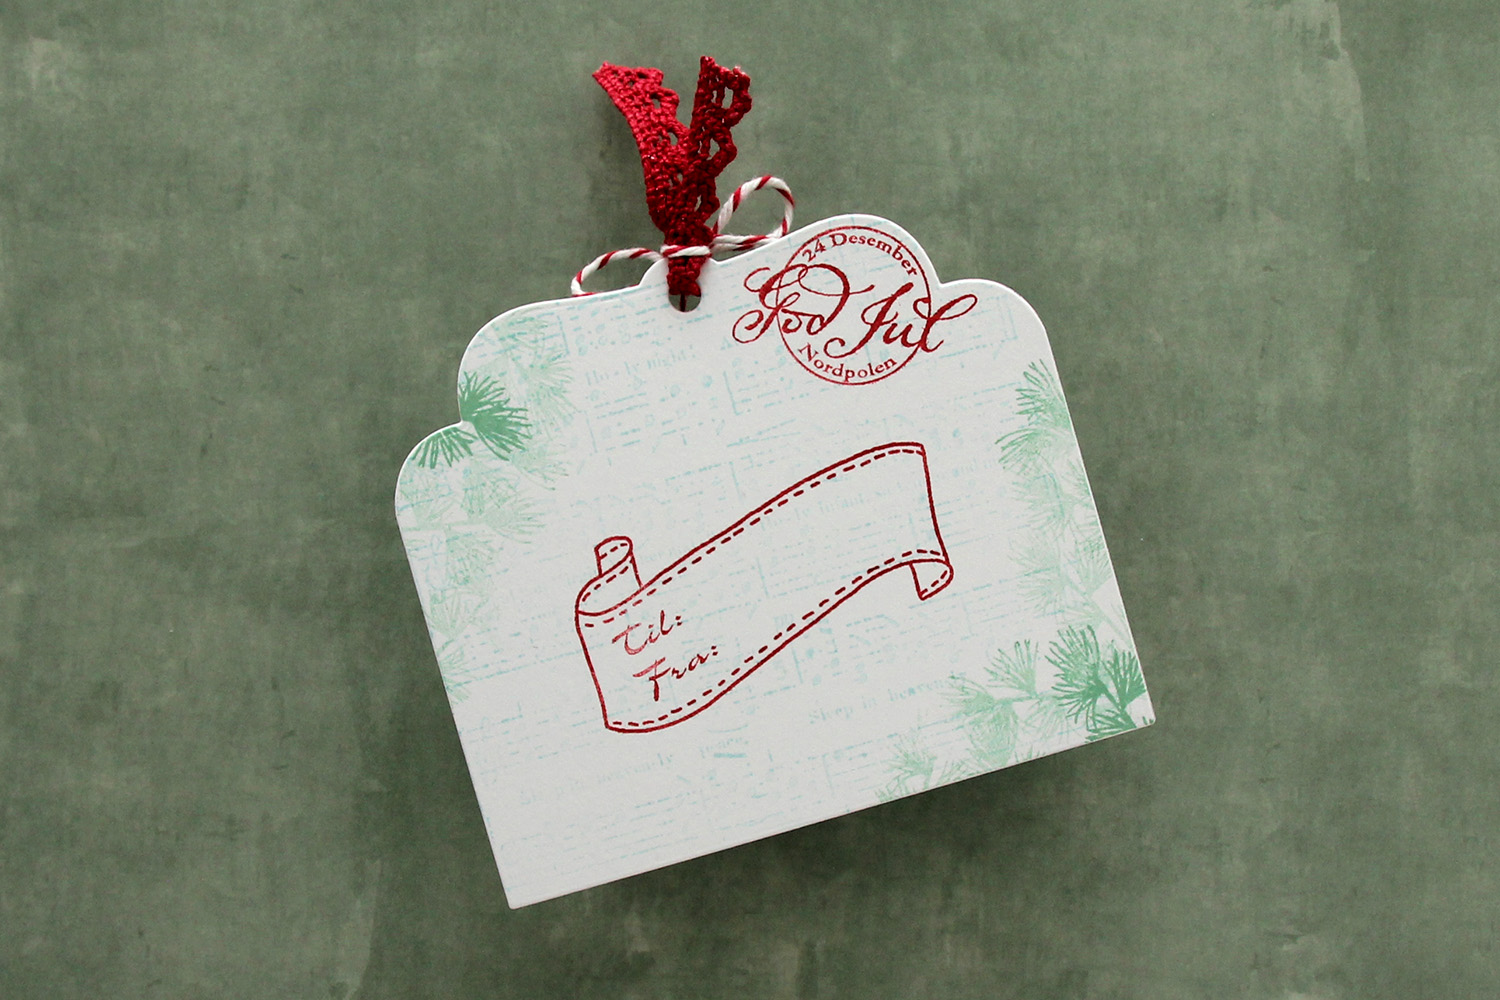 I die cut the tag a second time from white cardstock and did quite a bit of stamping on it. I used second generation stamping of an old sheet music stamp from Magnolia using Powder ink from Concord & 9th – I wanted it to be very soft. The sheet music is actually for Silent Night, making it extra Christmas-y – not that you can really tell. I used first and second generation stamping of a branch from a Mathia Design stamp set using Eucalyptus ink from Concord & 9th to add a little something to the corners. I stamped a postmark stamp from Ladybug & Friends, as well as a to/from stamp from Norsk Stempelblad AS using Amarena Cherry ink from My Favorite Things. I don’t think Ladybug & Friends is in business anymore. Neither is Norsk Stempelblad, but I love their stamps and can’t bring myself to stop using them.
 This
This  I colored my image with Copics, stamped a sentiment from Mathia Design using Ocean Tides ink from Papertrey Ink, before die cutting a bunch of white snowflakes from the same cardstock (X-Press It blending card) that I use to color on, so my whites would match. I used the Snowflake Confetti fancy die from Hero Arts, along with the CR1335 die from Marianne Design to die cut all my snowflakes. Both these dies cut lots of snowflakes at once, and the snowflakes are fairly small, making them ideal for a background like this. I adhered lots of snowflakes above the penguin’s head, then used a rectangle die from Waffle Flower to die cut my panel. I mounted it on foam tape onto a card base I created from Ocean Tides cardstock from Papertrey Ink, and my card was complete. Another Christmas card done for 2023.


 I colored my image with Copics on X-Press It blending card and added
  I put a piece of patterned paper from the Party Patterns paper pad from My Favorite Things on the card front, and mounted the image on foam tape. Lots of foam tape, I was not shy!
 I stamped and white heat embossed a

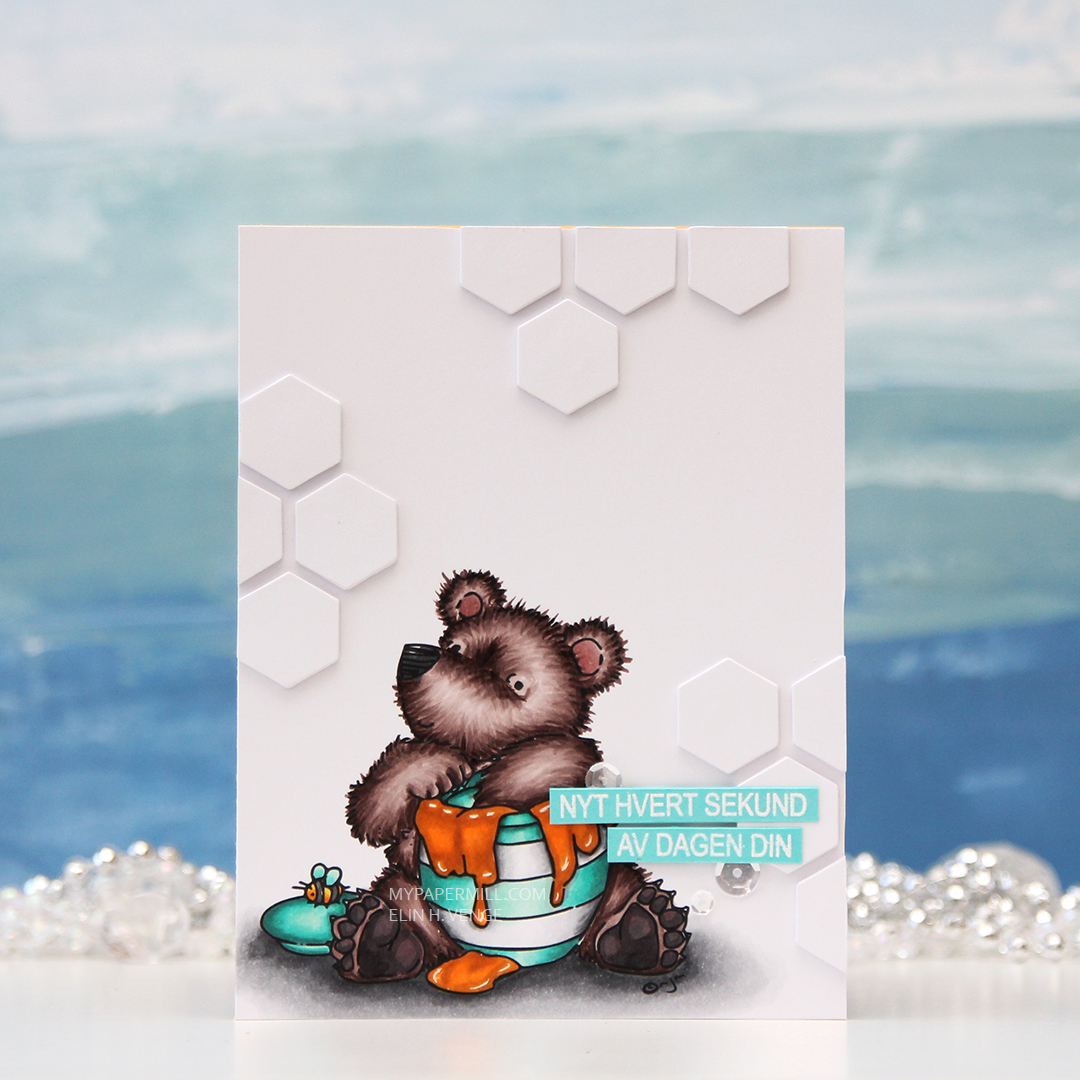 I started by coloring up the cute little bear with my Copics. I haven’t used my markers in quite some time, so I felt a little rusty going in, but I took my time and it came together in the end.
 I used a background die from Papertrey Ink to create my hexagons and stacked them five layers thick in three separate clusters on my card. I made the cardbase from Summer Sunrise cardstock (also from Papertrey Ink) just to shake things up a little bit, and glued some leftover hexagons on the inside.
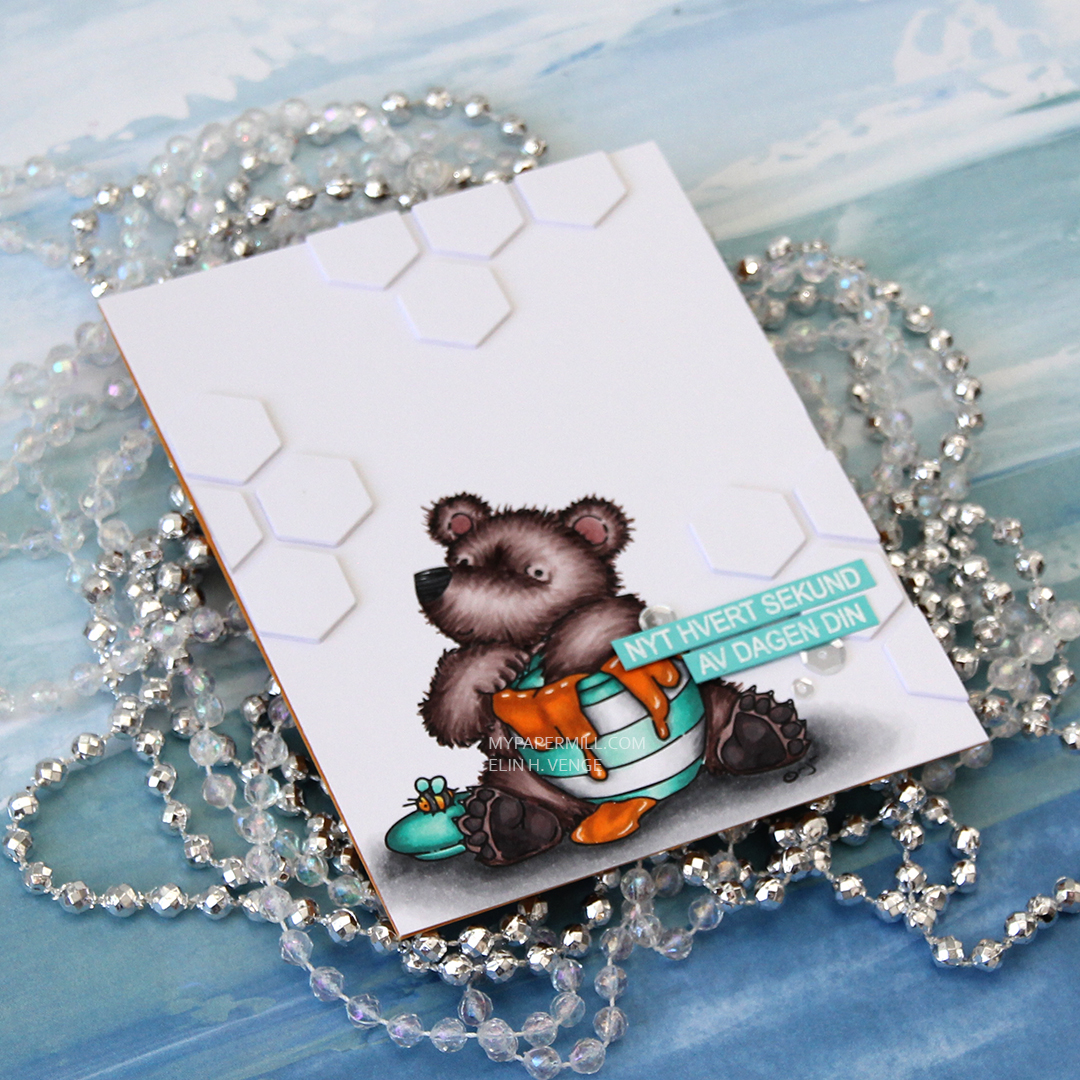 I stamped and white heat embossed a sentiment from Mathia Design onto Hawaiian Shores cardstock from Papertrey Ink before gluing my sentiment strips to the card using foam squares and liquid glue. I finished it off with a few sparkling clear sequins from Pretty Pink Posh, and my card was done.
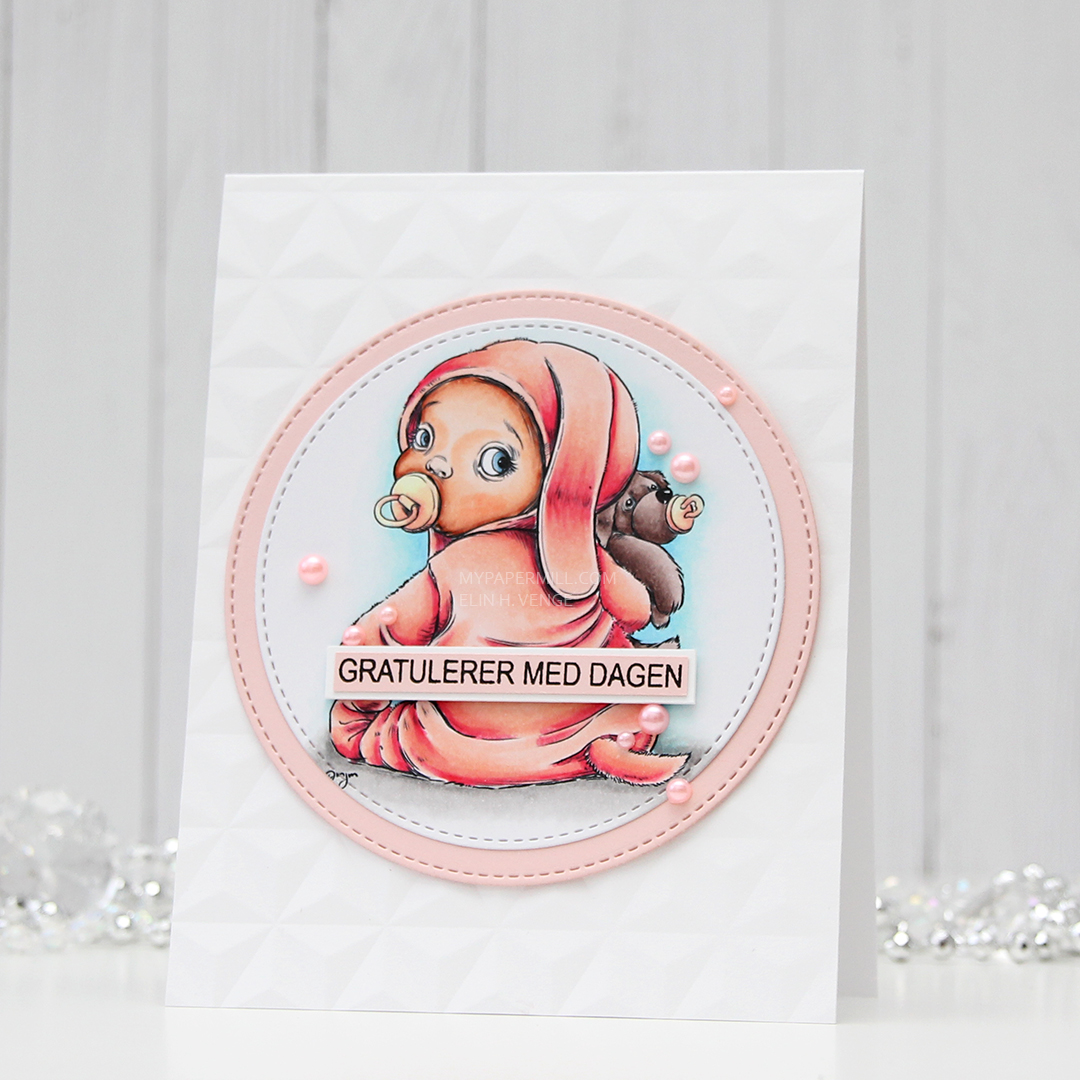 For this card i used
 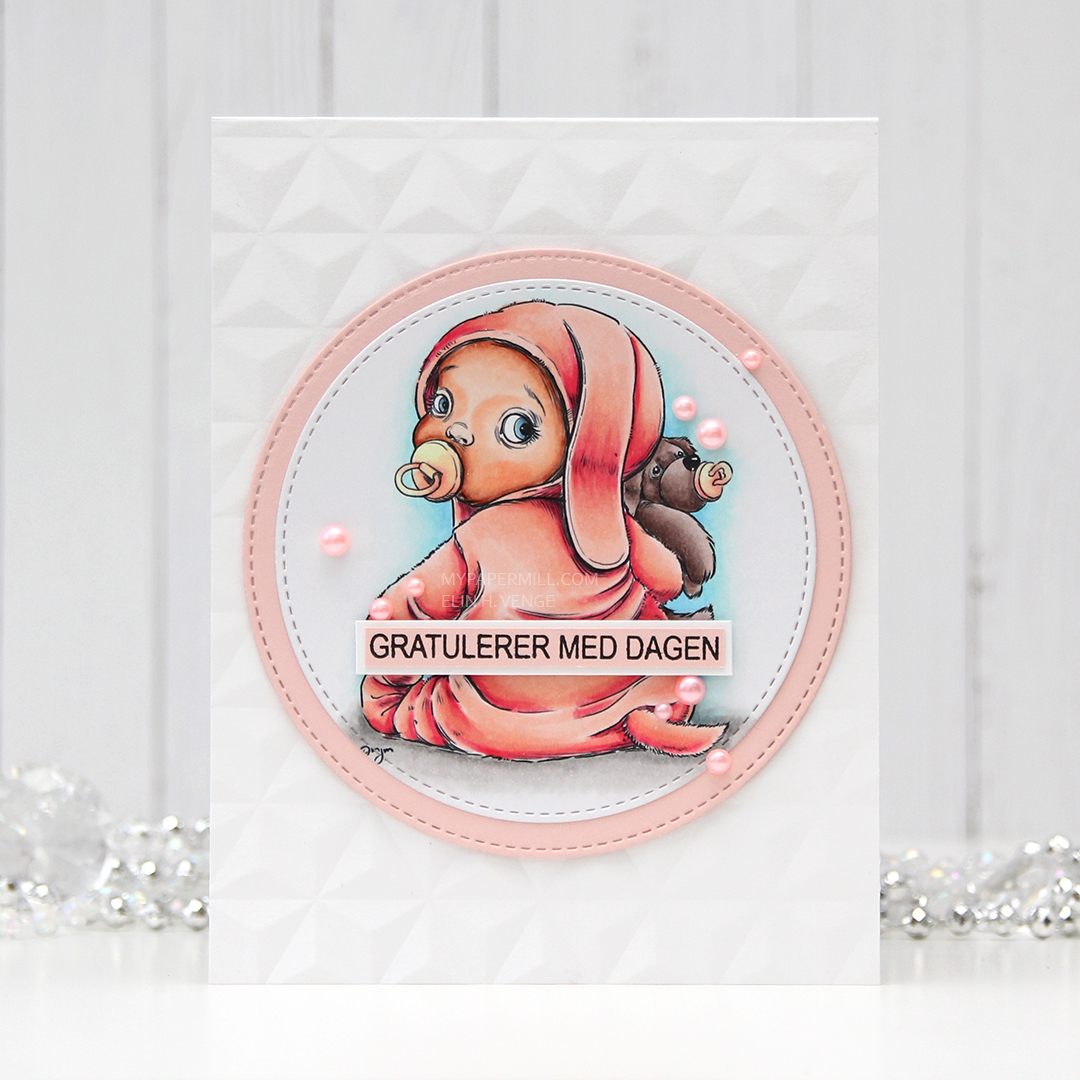 I used a stitched circle die from My Favorite Things to diecut the image, used a bigger die to cut from Sweet Blush cardstock from Papertrey Ink and glued the two circles together. I used an embossing folder from We R Memory Keepers to create texture to my background by running it through my Gemini Junior. I love that little machine.
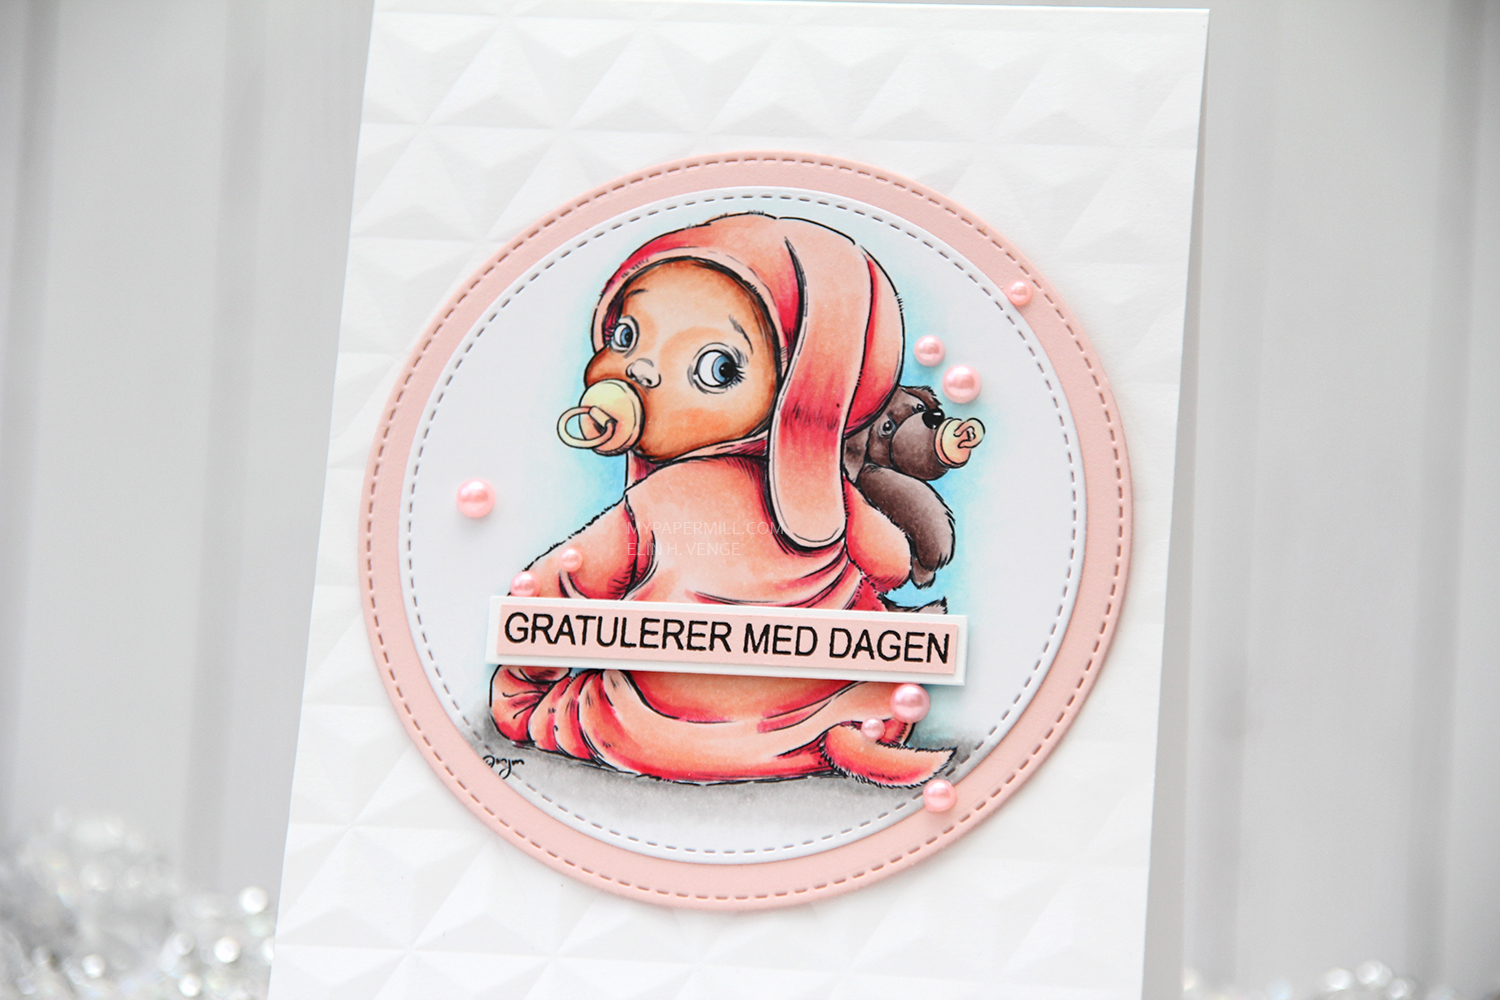 I used foam squares without too much dimension on the back of my circles, added them to the center of my card and added a stamped Mathia design sentiment with more foam squares. I finished off the card with a few pink pearls from Little Things from Lucy’s Cards.
 I really like the peachy pink combo I used for this one and colored many images around the same time using that same combo.
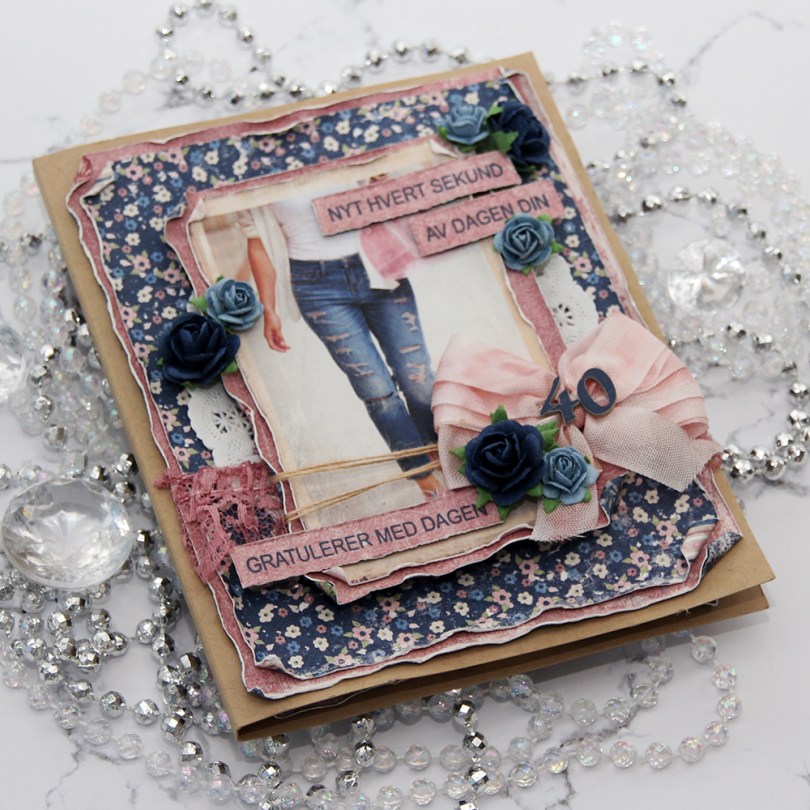
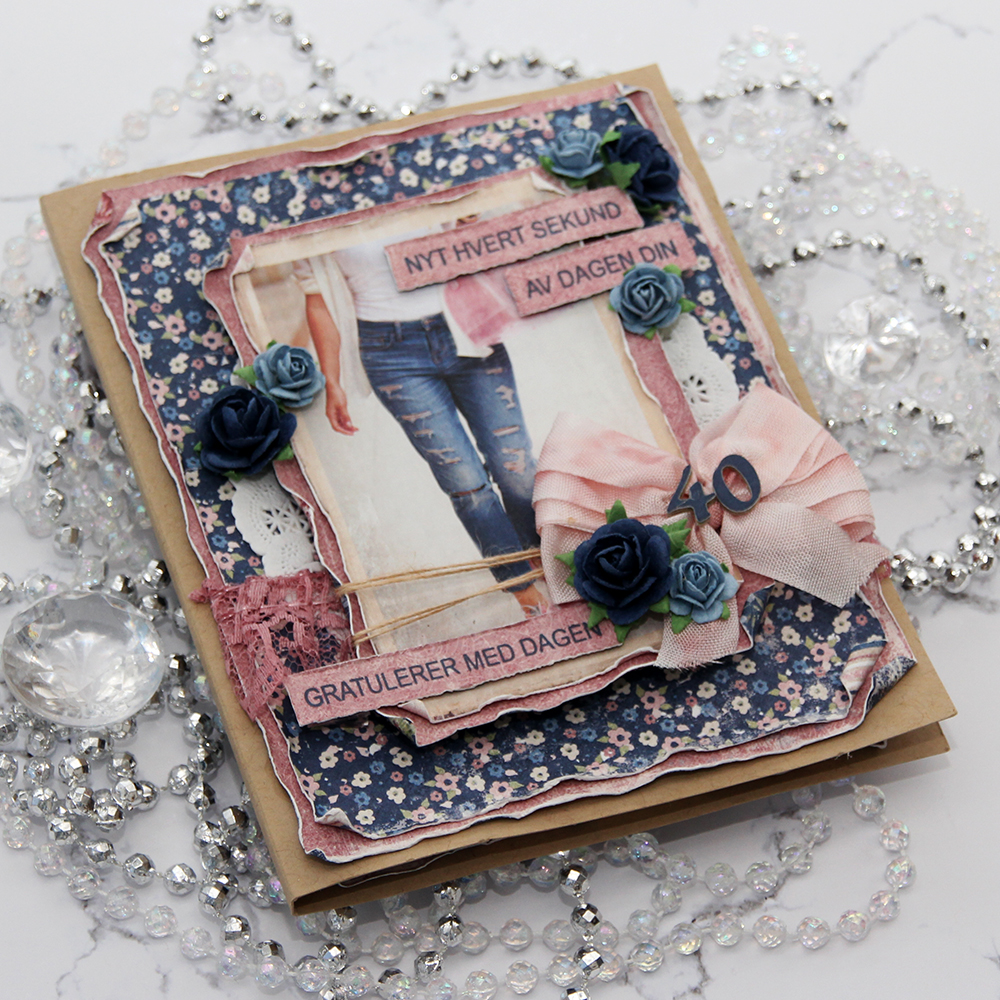 I was told that the birthday girl likes blue, pink and flowers. I knew just which papers to dig out from my stash. The paper I’ve used here is all from the Denim & Girls collection from Maja Design. I love their collections, the patterns are nice and small and the colors to die for. I mean, look at those blues!!! Amazing!!! I’ve predominantly featured two sheets on this card;
  I started by cutting down the patterned paper to the sizes I wanted, before using a paint brush with clean water to wet all the edges. This makes the paper more pliable, and I can curl the edges with my fingers, giving the paper some dimension and interest. The cool thing is that when it dries, it stays like that, it’s very sturdy. With Maja Design patterned paper it’s extra sturdy, because the paper is so thick you can actually use it for card bases. It’s really nice.
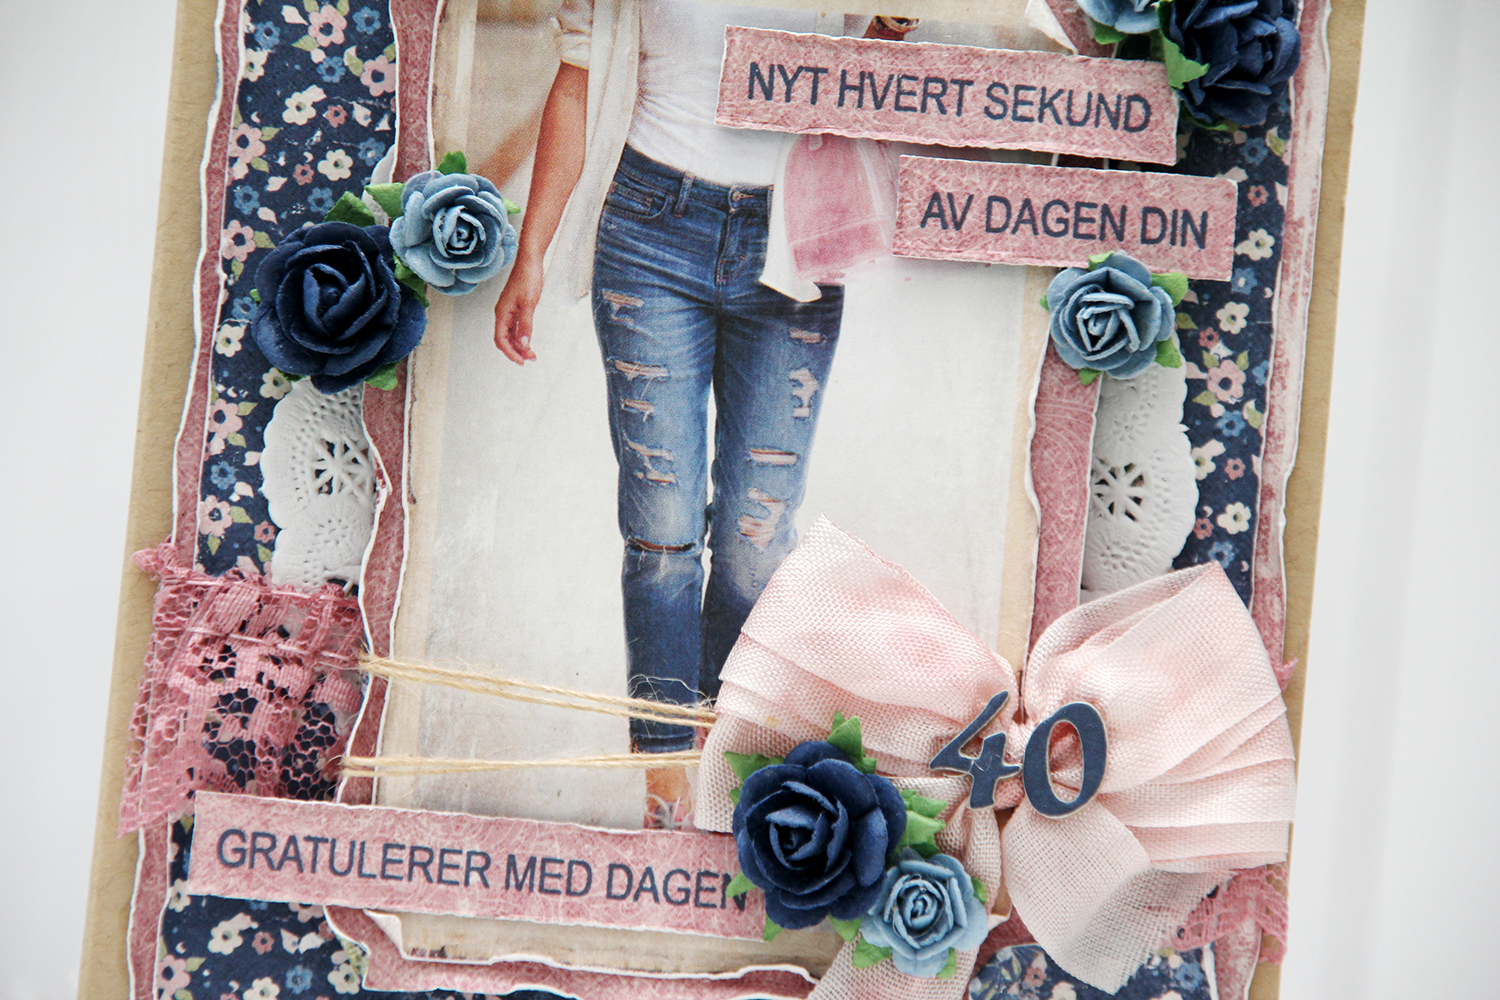 I added a paper doily, some pink lace, some May Arts natural twine, a bow, a couple of diecut numbers and a few paper roses from Papirdesign, in addition to a couple of sentiment strips. I stamped the
 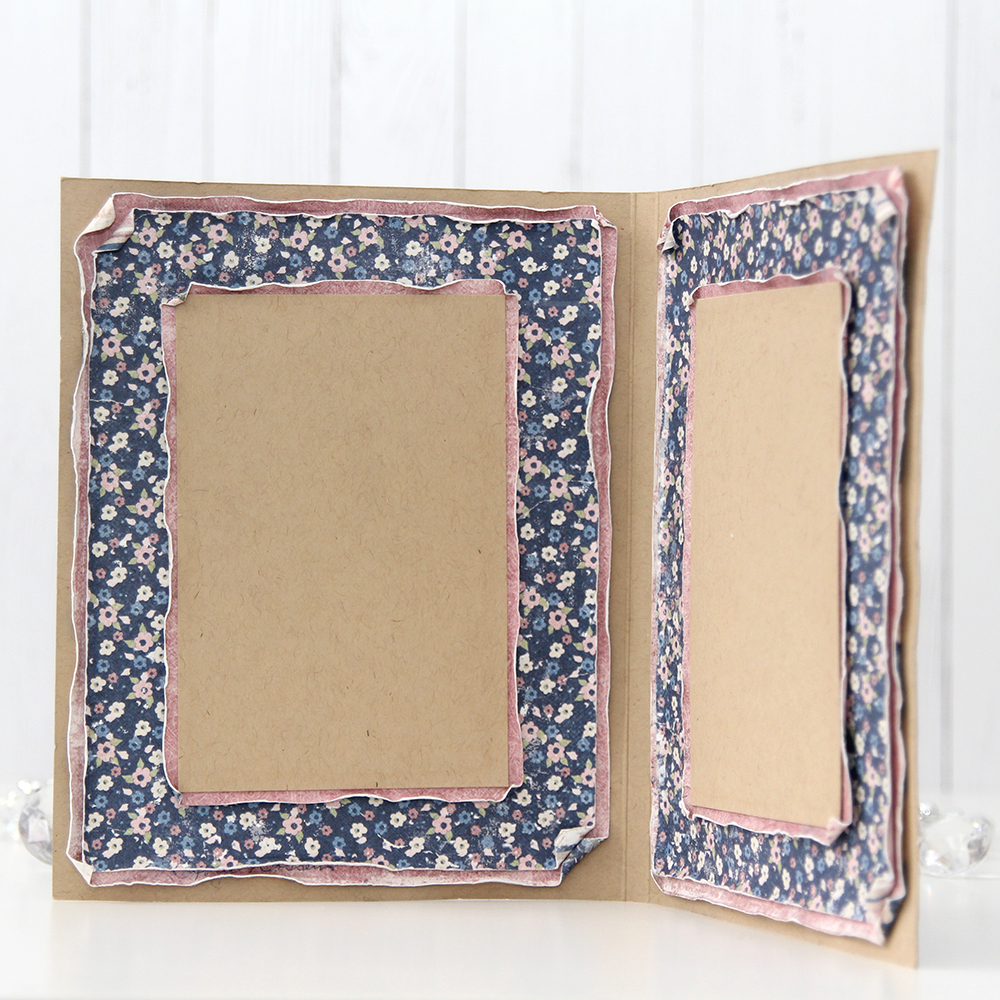 When creating this type of card I go all out and decorate all four sides of my card. I used the same layout on the insides, but skipped all the embellishments. The kraft panels are actually removable. I added double sided tape to the back in generous amounts, but left the release paper on, and glued the panels on using just a glue dot. Glue dots are a nice temporary solution, and it enables you to pull the panels out fairly easily, write your personal message, remove the release paper from the double sided tape and glue the panels back where they belong. It’s a great way to not have to write inside a bulky card.
 I had to decorate the back, too. I just had to. Same basic layout on the back. Not as heavily embellished as the front, also not as bare as the insides. I stamped a birthday sentiment from Norsk Stempelblad AS using the same color ink as the sentiment strips on the front, and added a few blue roses to finish the card.
 With cards this thick, they don’t fit in regular envelopes, so I usually make simple envelope boxes to match. This one is 1″ high, and it actually could have been a little higher, it was a little bulgy when the card went in. I diecut the blue patterned paper with a Simon Says Stamp label die and added pink diecut letters from Scrapmagasinet to spell the name of the birthday girl. I did two layers so the name wouldn’t get completely lost with that busy background.
 This time I used a
 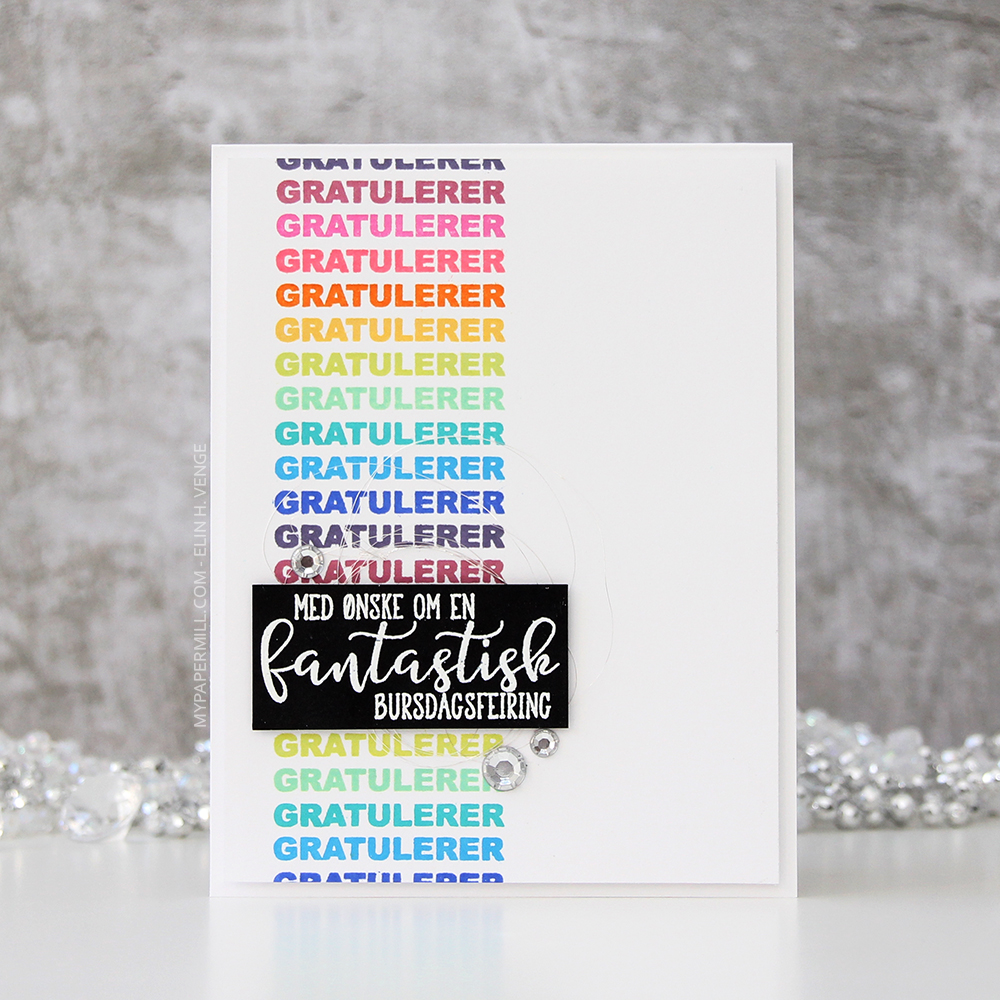 I stamped and white heat embossed a sentiment from another
 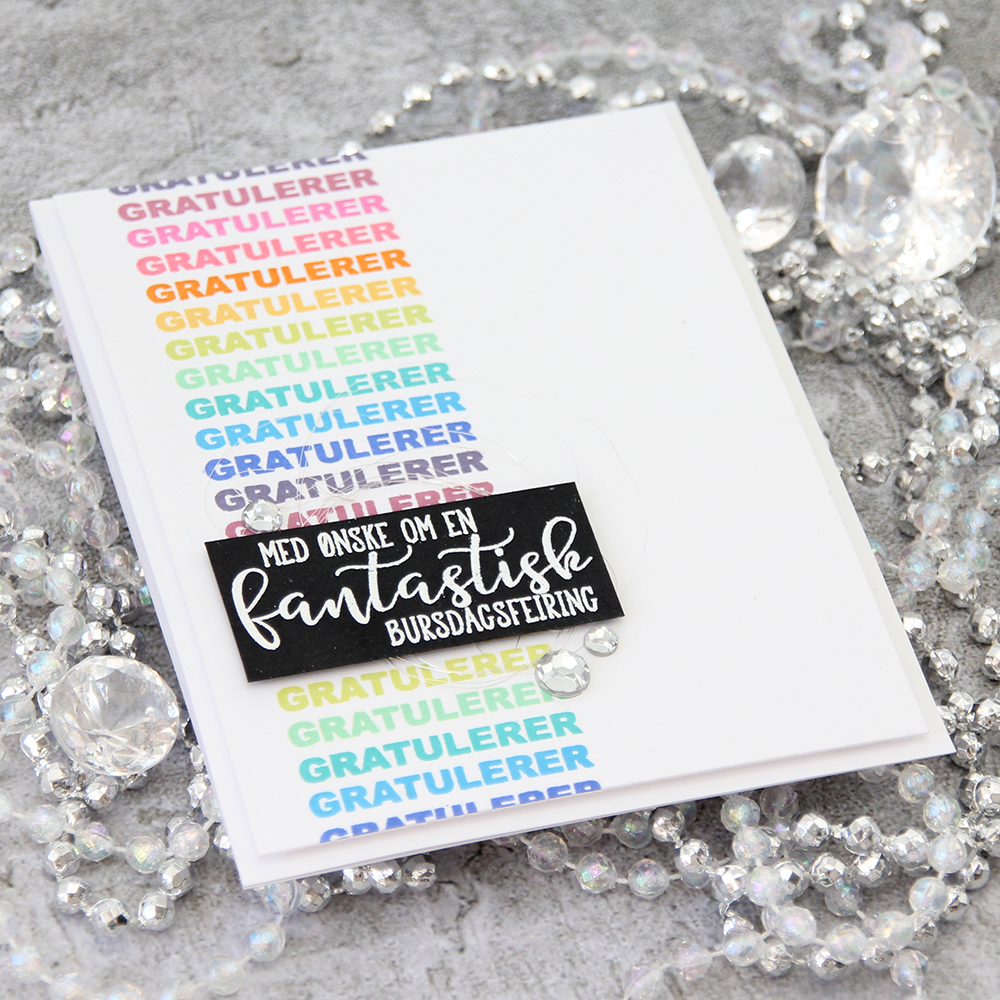 Behind the black cardstock piece I put a nest of angel hair. It’s a very very thin thread, and it has actual silver in it. I buy mine at the flower shop, one bag will last a looooong time. I finished off my card with some crystals of unknown origin. I know the brands of most of the stuff in my craft room, but these are a mystery.
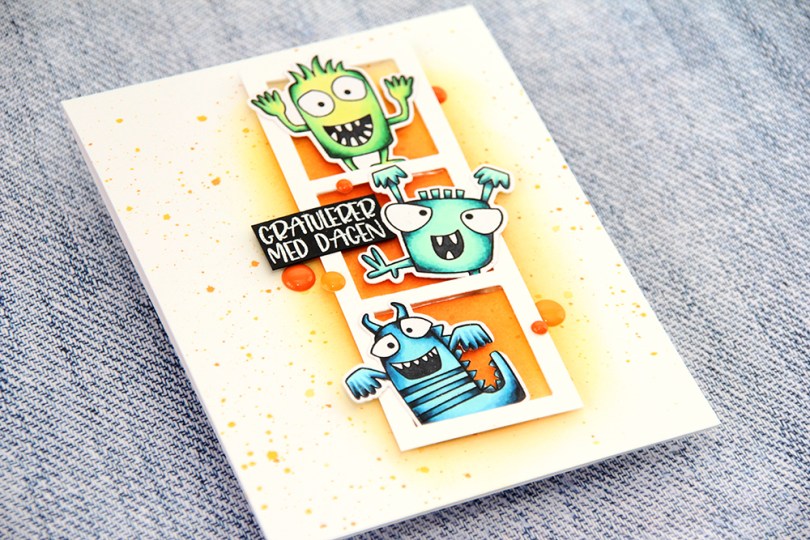
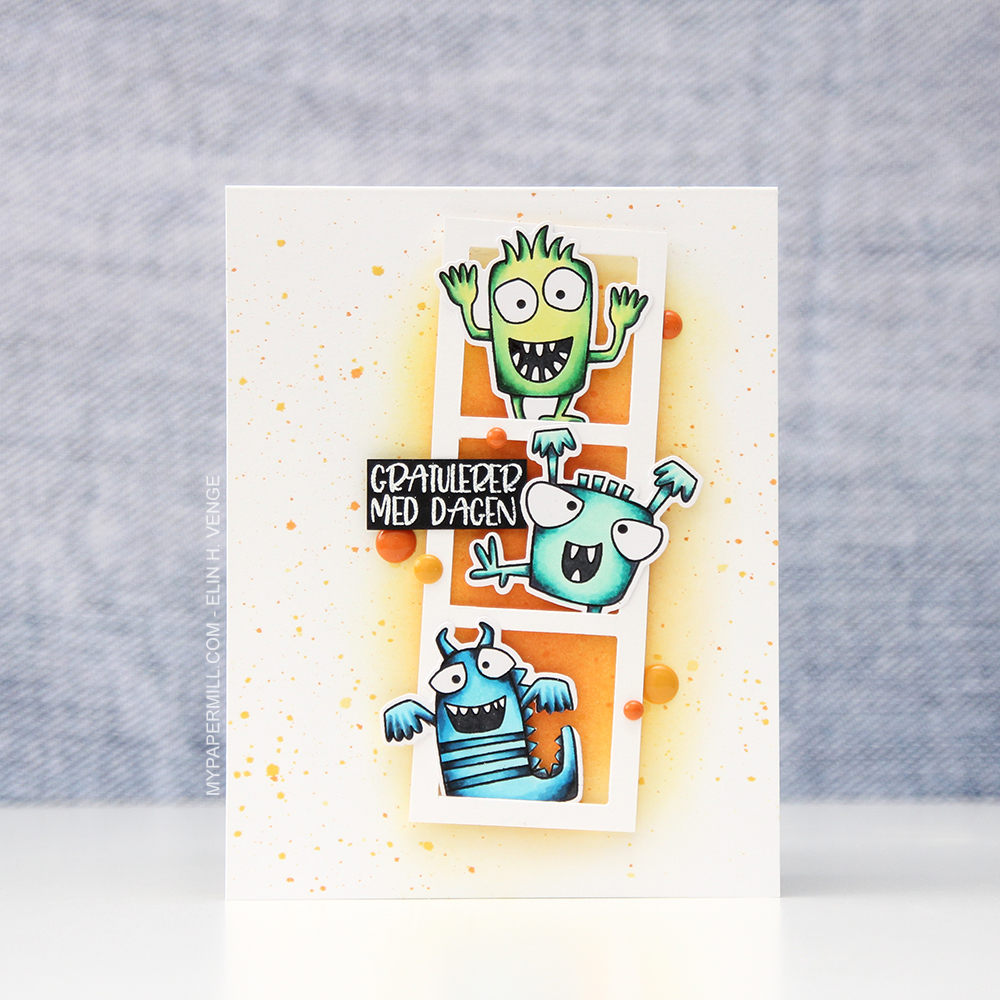 This card was a bit of an evolution. You might even call it remotely controlled cardmaking. I’ve been coloring so much lately, but not made a lot of cards, so I was really unsure of what to do when I sat down to create this.
 The first decision was to diecut those monsters from My Favorite Things. I usually like fussy cutting, but Liz decided that diecutting was the way to go with this one. She pretty much ran the show, I just did as she asked. I made my little frame and decided where it needed to go before going in with orange and yellow inks on the cardbase.
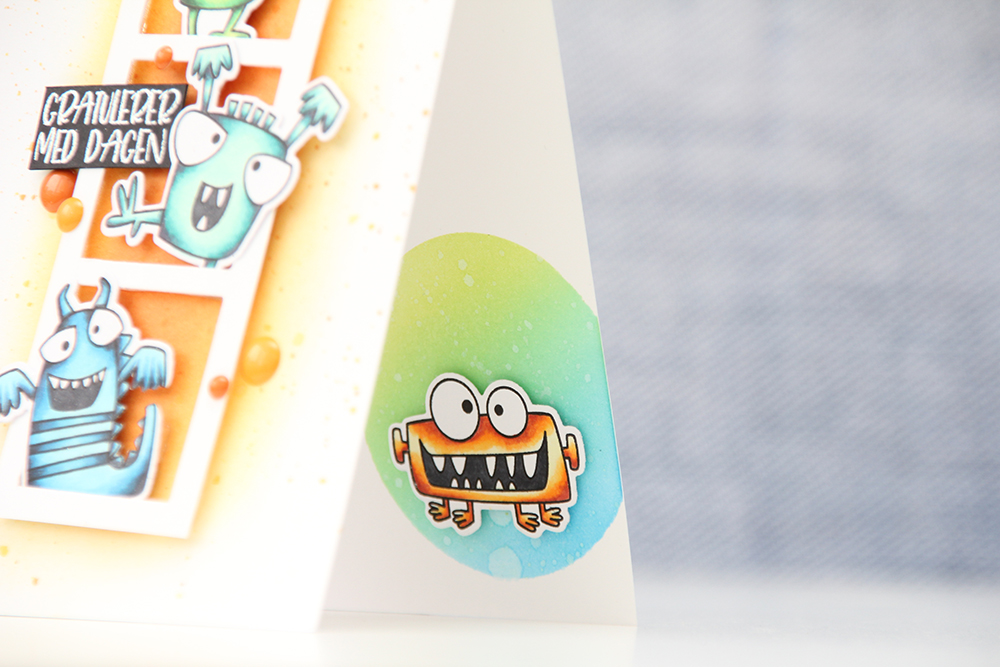 I had four monsters, so Liz urged me to put the last one on an ink blended circle on the inside. I asked her if she wanted paint splatters on the inside too, before I removed my circle mask. She wanted water splatters, so I added water splatters. I had a great time being remote controlled by her!
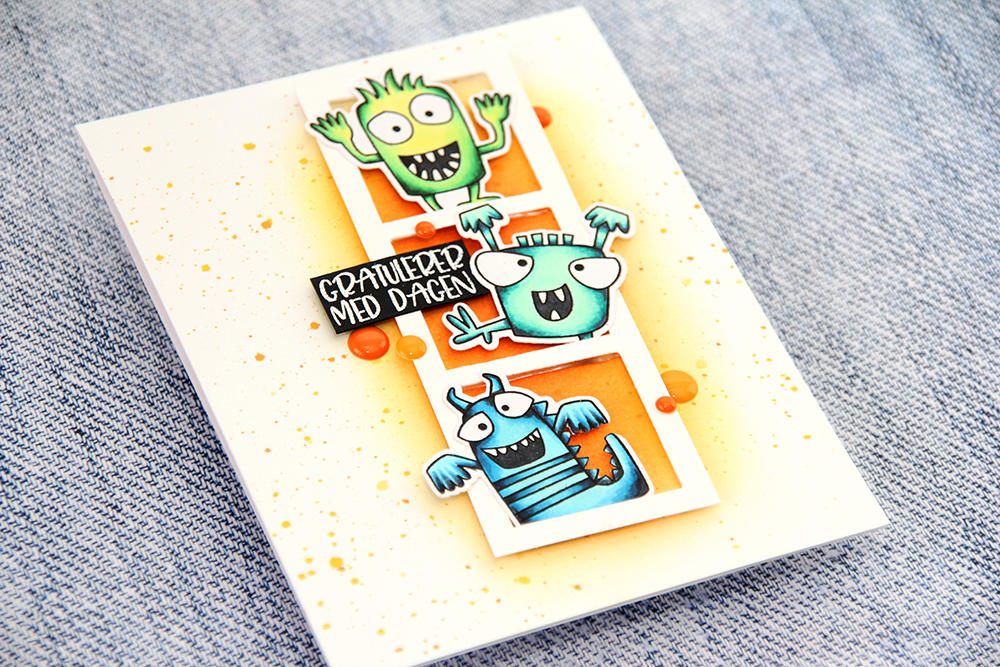 The sentiment (by Mathia Design) was a story in an of itself. By the time I got that far, I was super tired, so I struggled to decide where to put it. My “remote control” had also run out of batteries at that point, so I needed to sleep on it. This morning, it was a lot easier to decide. I added a few enamel dots close to the frame, and that finishes off my card. Or our card, I should say, I probably wouldn’t have gotten this done if it weren’t for Liz helping out!