
Hi, everyone!
I have a fairly simple birthday card to share with you today, featuring this cutie pie from Tiddly Inks. I colored up this image for day 21 of Kathy Racoosin’s 30 day coloring challenge in April, so it was about time I turned it into a card (though to be honest, I have images that have been sitting colored and unused way longer than that).

I like printing (or stamping) my images close to one corner of a quarter sheet of X-Press It blending card. That way, I know I’ll have lots of white space to play with and for the final card to breathe, I don’t like cards that are too busy and “crowded”, if that makes sense. I die cut my panel using my favorite stitched rectangle die from My Favorite Things, then actually went in with Memento Dandelion ink over my Geometric Landscape stencil from Altenew using a blender brush from Taylored Expressions. I rarely use yellow, and I rarely use stencils, but I wanted something other than my regular half mini doily behind my cluster of diecut scraps, and one of the hedgehogs is carrying a yellow heart, so I thought it was only fitting.

For the actual cluster I used scraps, which is a great way to use up all that oooold patterned paper (some of this is ten years old) I have laying around. These pieces are small, so it’s going to take me a while to use everything in my stash, but I’m working on it, one die cut at a time. I used the XCut Happy Days Ticket Stubs die for my cluster pieces. It’s one die that cuts nine different sized tickets in varying shapes, and I use it a lot on my cards. The papers are from (bottom layer to top layer) Imaginisce, Kaisercraft, and StudioLight. The little swirly line at the bottom of the cluster is a piece of paper from Fancy Pants, diecut using a die in the Tag Builder Blueprint 5 die set from My Favorite Things, the banner with the sentiment is from the same die set. The sentiment itself is from Norsk Stempelblad AS, stamped in Memento Bamboo Leaves ink. I thought it matched perfectly with the cardstock from My Favorite Things that I used as my card base. Those enamel dots from Papirdesign matched also.

Green is not a color I use often as my main color, but I’m trying to be better at using the entire rainbow and not just those gorgeous blues that I love so much. Even though blue IS the color of the year. Beautiful color for a crappy year, how’s that fair? 😉

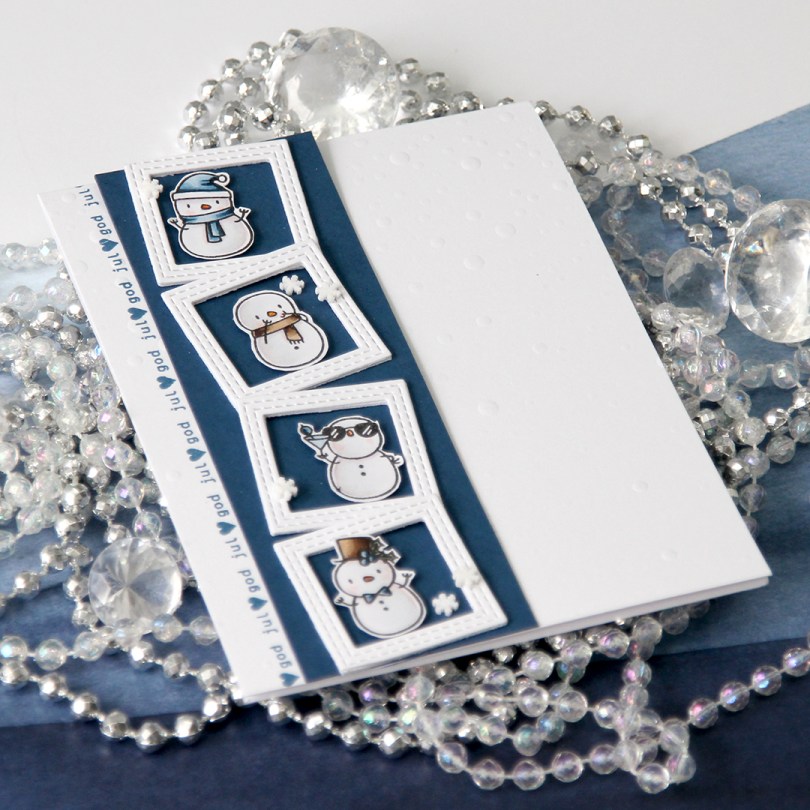


 I feel like every other day is Wednesday, and today’s another one. Time just goes by so incredibly quickly, it’s hard to keep up and keep track of the weekdays. I colored up
  I haven’t made one of my cluster cards in quite some time, but I really enjoy the process of putting these clusters together, so I decided to do it for this card. It’s a great way to use some patterned paper scraps, and one of these patterned papers is actually from 2007! It’s from Autumn Leaves. Remember them? I think it’s been a while since they ceased to exist. Now, when you go to autumleaves.com, you get to a site for assisted living communities for those with dementia. It’s a Texas based company, and definitely not a maker of pretty patterned paper. The other papers I’ve used are also what we’d call old in the card making world, the yellow one is from My Mind’s Eye and was released in 2011, and the remaining two were both released in 2013, they’re from Maja Design and Inkido, respectively.
 I use a couple of different dies to make these clusters, I make the banners using the Fishtail Flag Frames set from My Favorite Things, and I use the Happy Days Ticket Stubs die from Xcut for all those tickets. It’s one die that cuts nine different tickets, and I love that I get that many from one run through my diecutting machine. I mounted some of my diecut pieces on 1 mm foam tape, and glued others down using just double sided tape. Behind the whole thing I put half a mini paper doily from Doodlebug Design. I used the other half for the card I posted yesterday. On top I added a sentiment from Norsk Stempelblad AS stamped in Ocean Tides ink from Papertrey Ink. I mounted that on foam squares, and tripled up the foam squares on the left side of the banner. Finished off with a few pink dots from Papirdesign.
 I leave you with the colors I used for the adorable little girl. Not too many today.
 I wanted most of the focus on the cute little parade, so I kept the rest pretty simple. I made a cardbase from Hibiscus Burst cardstock from Papertrey Ink. It matches the pinks in my image perfectly. I used a die from Kort & Godt to diecut the main sentiment from four layers of the same color cardstock, layering them for a dimensional effect.
 I white heat embossed a Norsk Stempelblad AS sentiment (time for balloons and soda) onto Stormy Sea cardstock (also from Papertrey Ink). I stacked four layers on this one too, making the sub sentiment flush with the diecut word.
 I added a couple of matte gold sequins from the Mint Gold sequins mix from Little Things from Lucy’s Cards as a finishing touch. They sort of match the cymbals the tiny squirrel is holding, and also the drumsticks. Simple, bright and cheerful. If this birthday card doesn’t put a smile on someone’s face, I don’t know what will.
 I leave you with the colors I used for this image. Not really a whole lot for this one.
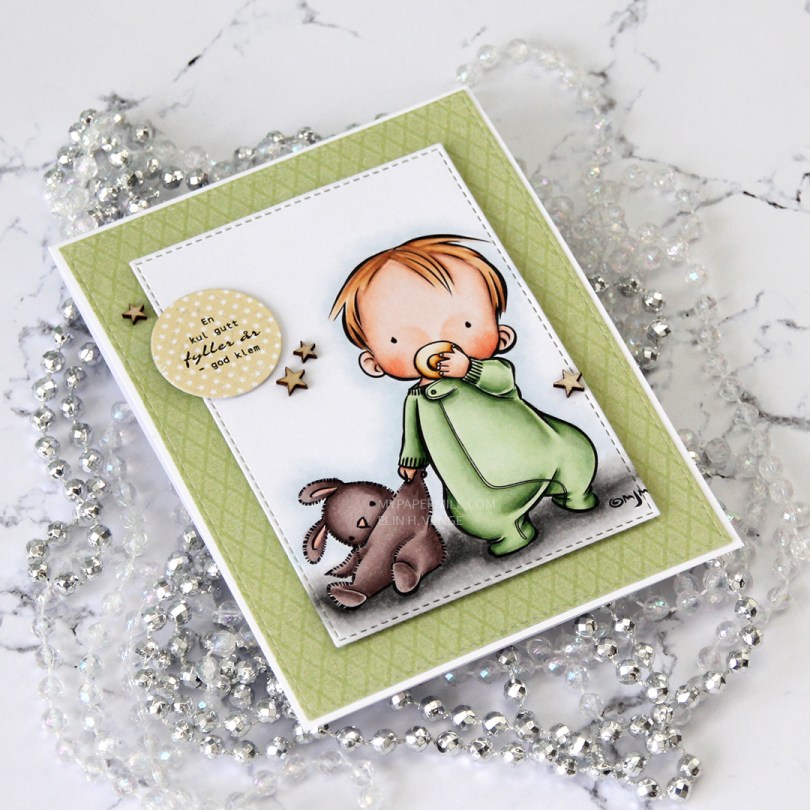
 I’m doing my best to make my pile of patterned paper scraps shrink and not grow. My biggest problem with that is that most of my cards are fairly simple without a lot of patterned paper, and my scrap pile feels endless. Still I keep chipping away at it, hoping it’ll be visibly smaller one of these days. For this card I used an old green scrap from Pion Design and a yellow one from Papirdesign. I diecut both, the green using the largest of the stitched rectangle dies from My Favorite Things, and the yellow one using a super old Quickutz die.
 I also diecut the image using a smaller stitched rectangle die from MFT, and popped the panel up on foam tape centered on my card. I used some 1 mm foam squares to adhere my circle diecut with a stamped sentiment from Norsk Stempelblad AS.
 I finished off the card by scattering veneer stars from Studio Calico at a diagonal across.
 These are the colors I used to color the image. I also used B40, which is a color I’ve made myself.
 Cards like this come together very easily, it’s basically a bunch of diecutting and you’re done. I use two full 12×12 sheets of patterned paper for cards like this, and the beauty is that there are no scraps left when I’m done. For this one I used two sheets from Papirdesign, one is Roseduft, and the other is stemorsblomst, blå.
 I added flowers from Wild Orchid Crafts, Kort & Godt and Papirdesign along the edge of two opposite quadrants on my circle, used letter stickers from Papirdesign to spell her name and some diecut numbers for her age. I finished off the front of the card using diamonds from Kort & Godt.
 I kept the insides pretty simple, with plenty of room for a personal message for the birthday lady. I added some more diamonds to embellish a tiny bit.
 On the back of the card I used more flowers, more diamonds and stamped a Norsk Stempelblad AS sentiment using Autumn Rose ink from Papertrey Ink. “Happiness is the art of creating a bouquet of the flowers within reach.”
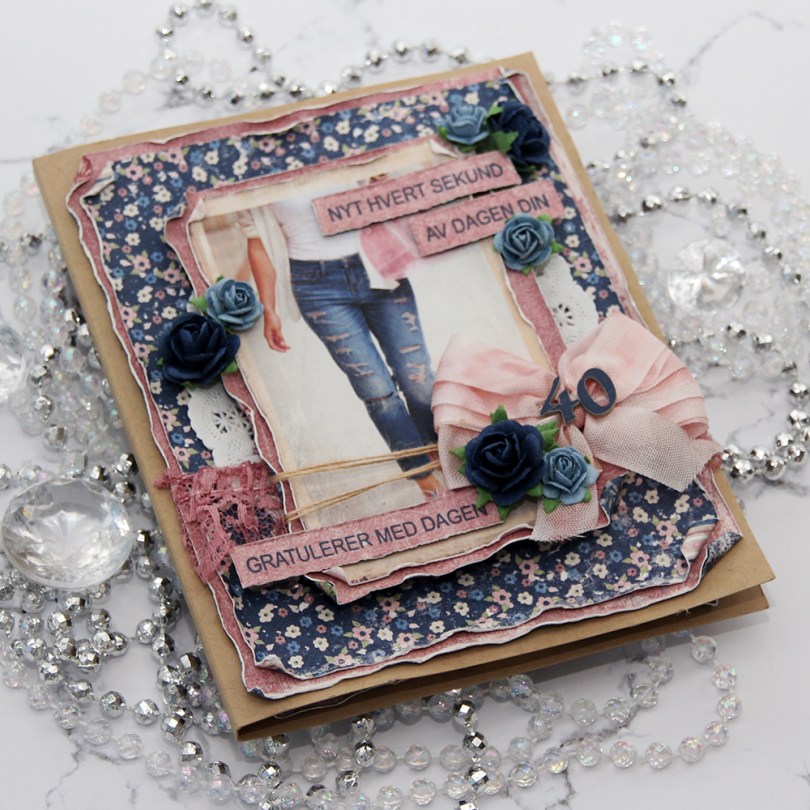
 I was told that the birthday girl likes blue, pink and flowers. I knew just which papers to dig out from my stash. The paper I’ve used here is all from the Denim & Girls collection from Maja Design. I love their collections, the patterns are nice and small and the colors to die for. I mean, look at those blues!!! Amazing!!! I’ve predominantly featured two sheets on this card;
  I started by cutting down the patterned paper to the sizes I wanted, before using a paint brush with clean water to wet all the edges. This makes the paper more pliable, and I can curl the edges with my fingers, giving the paper some dimension and interest. The cool thing is that when it dries, it stays like that, it’s very sturdy. With Maja Design patterned paper it’s extra sturdy, because the paper is so thick you can actually use it for card bases. It’s really nice.
 I added a paper doily, some pink lace, some May Arts natural twine, a bow, a couple of diecut numbers and a few paper roses from Papirdesign, in addition to a couple of sentiment strips. I stamped the
  When creating this type of card I go all out and decorate all four sides of my card. I used the same layout on the insides, but skipped all the embellishments. The kraft panels are actually removable. I added double sided tape to the back in generous amounts, but left the release paper on, and glued the panels on using just a glue dot. Glue dots are a nice temporary solution, and it enables you to pull the panels out fairly easily, write your personal message, remove the release paper from the double sided tape and glue the panels back where they belong. It’s a great way to not have to write inside a bulky card.
 I had to decorate the back, too. I just had to. Same basic layout on the back. Not as heavily embellished as the front, also not as bare as the insides. I stamped a birthday sentiment from Norsk Stempelblad AS using the same color ink as the sentiment strips on the front, and added a few blue roses to finish the card.
 With cards this thick, they don’t fit in regular envelopes, so I usually make simple envelope boxes to match. This one is 1″ high, and it actually could have been a little higher, it was a little bulgy when the card went in. I diecut the blue patterned paper with a Simon Says Stamp label die and added pink diecut letters from Scrapmagasinet to spell the name of the birthday girl. I did two layers so the name wouldn’t get completely lost with that busy background.
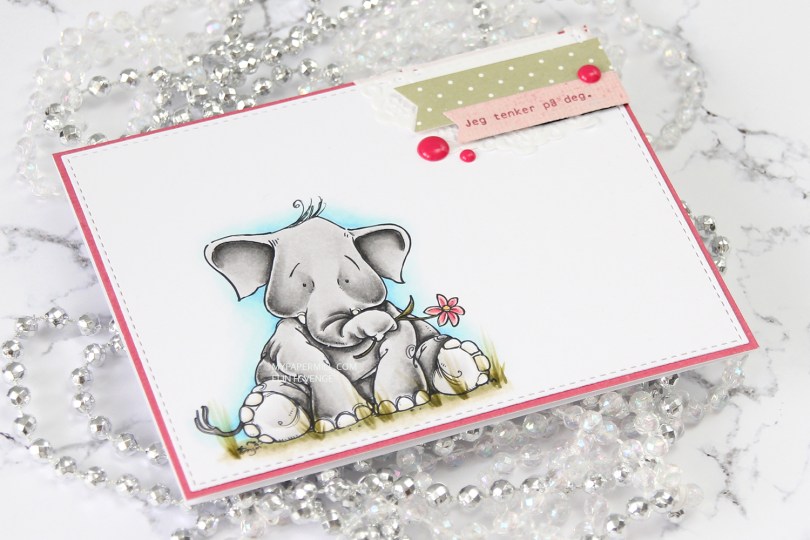
 This is another one that I’ve colored for Kathy Racoosin’s 30 day coloring challenge. I’m getting better at putting my colored images to use. I colored this one for day 13 of the challenge back in March, so this cute little elephant hasn’t had to wait too long.
 I used the largest of the dies in a faux stitched rectangle die set from My Favorite Things to create my panel and glued it onto a scrap piece of patterned paper from Pion Design that I’d already cut to fit the size of my card. I added a cluster in the top right corner, I’ve got part of a Doodlebug doily, a couple of patterned paper banners (also diecut with dies from My Favorite Things) and a few enamel dots from My Mind’s Eye.
 That light pink paper is from the same paper collection from Pion Design as the darker pink (Vintage Garden collection), and the green one with the dots is from Inkido. I stamped a Norsk Stempelblad AS sentiment using Autumn Rose ink from Papertrey Ink, and that finishes my card.
 Lots of greys, greens and even blues for this one, even if the card mostly reads as pink. 3
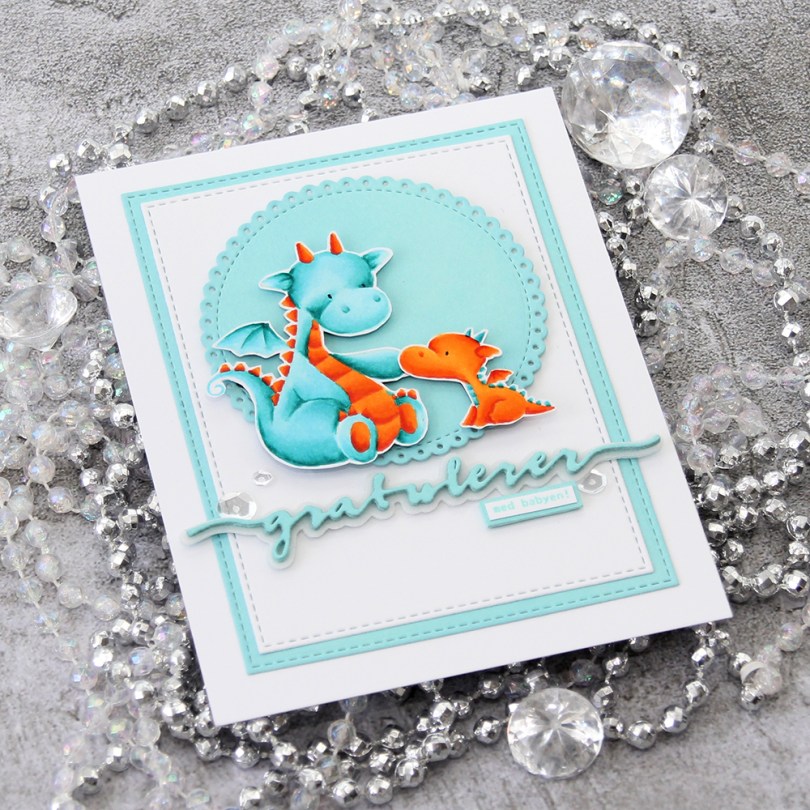

 I’d already fussy cut my dragons, but I used the Stitched Rectangles STAX sets (both sets, actually) to create my little frame, and glued them both straight onto my card base. I also diecut a scalloped eyelet circle using a CottageCutz die and mounted it on thin, black foam tape from Gina K. Designs for a little bit of dimension. I used the same foam tape on the back of my dragons and glued them to the circle. I created a stacked diecut sentiment using dies from Papirdesign and stamped a small sub sentiment from Norsk Stempelblad AS using Hawaiian Shores ink from Papertrey Ink. I embellished very simply with some sequins from Pretty Pink Posh, and that finishes my card.
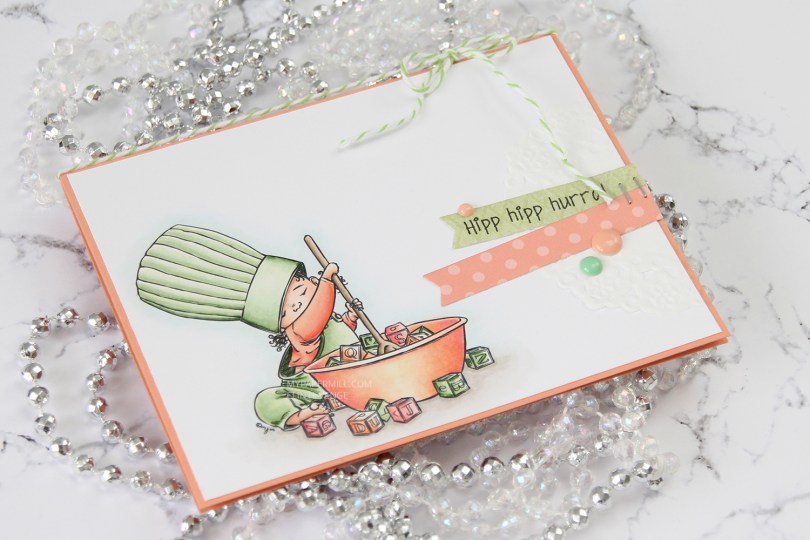
 I printed my image onto X-Press It blending card towards the bottom left corner of a quarter sheet. I colored it in with my Copics, before trimming it down to 5 3/8 x 4 1/8″. I wanted the Melon Berry cardbase from Papertrey Ink to show around the edges, and this size panel creates the perfect 1/16″ border on all four sides.
 If you’ve seen a card or two from me previously, you’ll no doubt know that I’m a fan of adding clusters on my cards. They vary in size and some are simpler than others, but they tend to have three things in common: a piece of a paper doily, fishtail banners and enamel dots or sequins. I also usually put my elements on straight, but this time I went for a less rigid look. I went through my patterned paper scraps and found a green piece from the Vintage Garden collection by Pion Design and diecut it using a fishtail flag frame die from My Favorite Things. I thought I’d have to go for just a piece of cardstock for the other banner, but then I remembered that I have a paper pack from Sunny Studio with pastel colors, and one of them fit perfectly.
 I stamped a Norsk Stempelblad AS sentiment onto the green banner using My Favorite Things Extreme Black ink and stapled the two banners together before gluing them onto the card. I added a string of Green Apple divine twine to the top of the card and a few My Mind’s Eye enamel dots to finish it off. In real life, the green dot looks closer to the greens I used in my image. Photos sometimes lie.
