Hi, everyone. I’ve got a birthday card to share with you today, but it’s not in my usual clean and simple style, it’s a more layered card. I used to make this kind of card all the time when I first started making cards, and it’s what I feel I have to go back to whenever I get an order for a card. It’s a good way for me to justify the price I set.
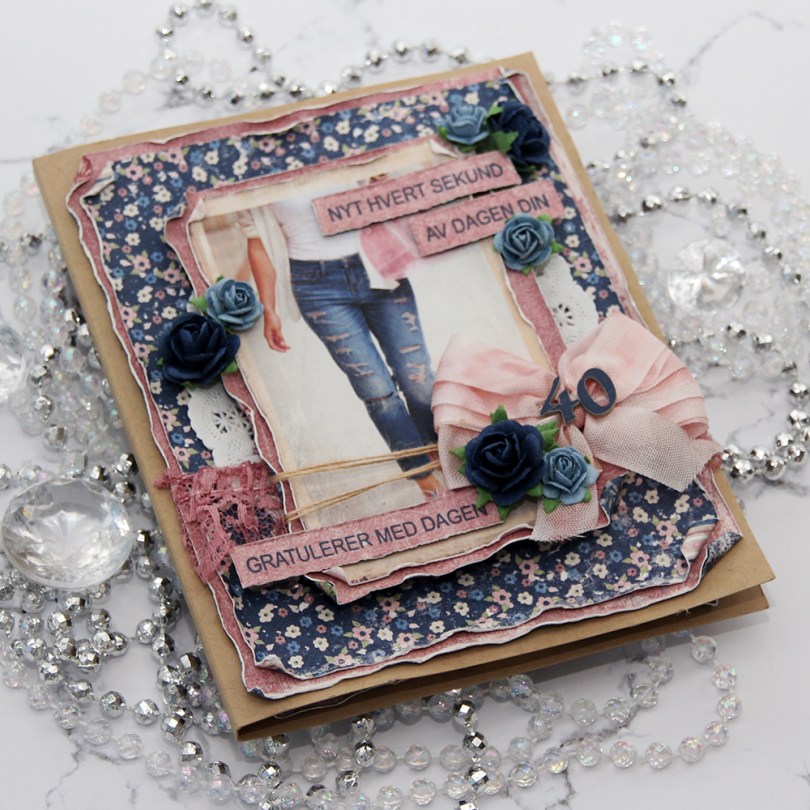
 I was told that the birthday girl likes blue, pink and flowers. I knew just which papers to dig out from my stash. The paper I’ve used here is all from the Denim & Girls collection from Maja Design. I love their collections, the patterns are nice and small and the colors to die for. I mean, look at those blues!!! Amazing!!! I’ve predominantly featured two sheets on this card; Summer outfit (which is the blue with the flowers) and Romantic blouse (the pink one). The image comes from the Snapshots sheet.
 I started by cutting down the patterned paper to the sizes I wanted, before using a paint brush with clean water to wet all the edges. This makes the paper more pliable, and I can curl the edges with my fingers, giving the paper some dimension and interest. The cool thing is that when it dries, it stays like that, it’s very sturdy. With Maja Design patterned paper it’s extra sturdy, because the paper is so thick you can actually use it for card bases. It’s really nice.
 I added a paper doily, some pink lace, some May Arts natural twine, a bow, a couple of diecut numbers and a few paper roses from Papirdesign, in addition to a couple of sentiment strips. I stamped the Mathia design sentiments straight onto the pink patterned paper using Enchanted Evening ink from Papertrey Ink, distressed the edges of the strips slightly with a finger nail and mounted them on foam tape. The top sentiment translates to “Enjoy every second of your day” and the bottom one says “Happy birthday”.
 When creating this type of card I go all out and decorate all four sides of my card. I used the same layout on the insides, but skipped all the embellishments. The kraft panels are actually removable. I added double sided tape to the back in generous amounts, but left the release paper on, and glued the panels on using just a glue dot. Glue dots are a nice temporary solution, and it enables you to pull the panels out fairly easily, write your personal message, remove the release paper from the double sided tape and glue the panels back where they belong. It’s a great way to not have to write inside a bulky card.
 I had to decorate the back, too. I just had to. Same basic layout on the back. Not as heavily embellished as the front, also not as bare as the insides. I stamped a birthday sentiment from Norsk Stempelblad AS using the same color ink as the sentiment strips on the front, and added a few blue roses to finish the card.
 With cards this thick, they don’t fit in regular envelopes, so I usually make simple envelope boxes to match. This one is 1″ high, and it actually could have been a little higher, it was a little bulgy when the card went in. I diecut the blue patterned paper with a Simon Says Stamp label die and added pink diecut letters from Scrapmagasinet to spell the name of the birthday girl. I did two layers so the name wouldn’t get completely lost with that busy background.
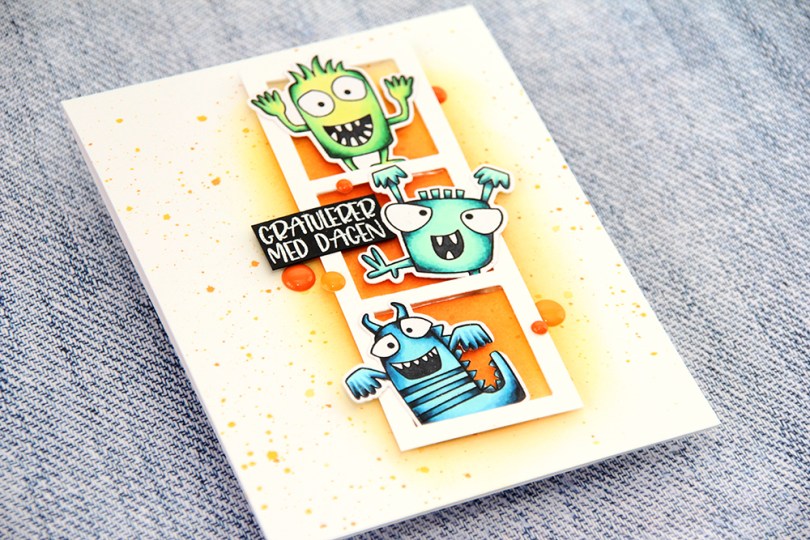
 This card was a bit of an evolution. You might even call it remotely controlled cardmaking. I’ve been coloring so much lately, but not made a lot of cards, so I was really unsure of what to do when I sat down to create this.
 The first decision was to diecut those monsters from My Favorite Things. I usually like fussy cutting, but Liz decided that diecutting was the way to go with this one. She pretty much ran the show, I just did as she asked. I made my little frame and decided where it needed to go before going in with orange and yellow inks on the cardbase.
 I had four monsters, so Liz urged me to put the last one on an ink blended circle on the inside. I asked her if she wanted paint splatters on the inside too, before I removed my circle mask. She wanted water splatters, so I added water splatters. I had a great time being remote controlled by her!
 The sentiment (by Mathia Design) was a story in an of itself. By the time I got that far, I was super tired, so I struggled to decide where to put it. My “remote control” had also run out of batteries at that point, so I needed to sleep on it. This morning, it was a lot easier to decide. I added a few enamel dots close to the frame, and that finishes off my card. Or our card, I should say, I probably wouldn’t have gotten this done if it weren’t for Liz helping out!
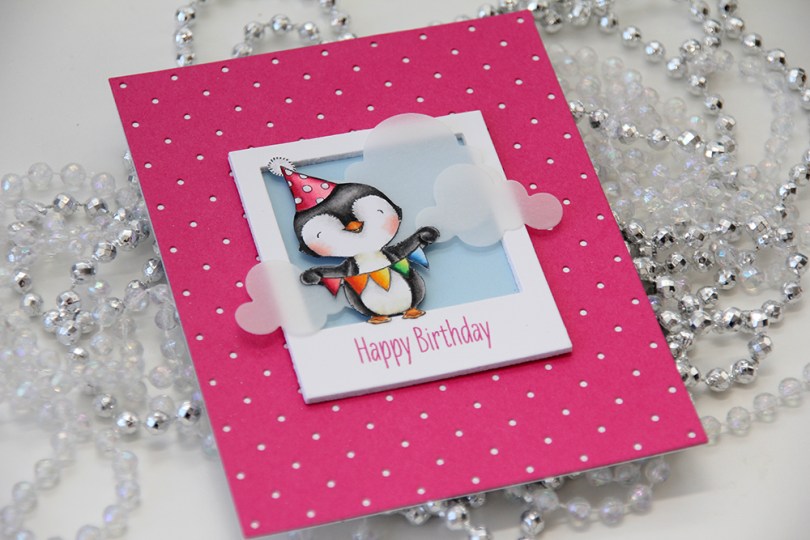
 I love every image Stacey Yacula designs. This little penguin, from the
  I created a polaroid frame by diecutting the
  I wanted a little bit of interest to my background and diecut a piece of Raspberry Fizz cardstock from Papertrey Ink with the
  I glued my polaroid frame in the center of the card and added a few strategically placed vellum clouds. Because they hang off the edge of the frame, they break up the rigid rectangular look a little bit.
 I’m still working through my Christmas images with no line coloring, and I adore this one, she’s so cute balancing those baubles!! Baubles are fun to color too, so all in all, this was a joy to make.
 I ran out of my favorite white cardstock while working on my Christmas cards, so I had to get creative with card bases and patterned paper before I got a new shipment! For this one I used Olive cardstock from Simon Says Stamp, it matches perfectly with the greens in the patterned paper from Maja Design and my coloring.
 I diecut the panel with my little elf using the larges of the faux stitch rectangle dies from My Favorite Things and glued it straight to a piece of Maja Design patterned paper the same size as my card base. I added a piece of a Doodlebug Design mini doily and a couple of banners made from patterned paper scraps. I diecut both banners with dies from the Fishtail Flag Frames set from My Favorite Things, stamped a Huldra designstudio sentiment on one of them and white heat embossed it. As a last finishing touch, I added a few crystal to draw the eye to the sentiment.
 The banner with the sentiment is mounted with 1 mm foam tape, everything else is glued flat, making this a card that will have no trouble going through the mail.
 I managed to include BG90 twice in my little Copic chart, maybe I shouldn’t make my charts when it’s way past bed time??
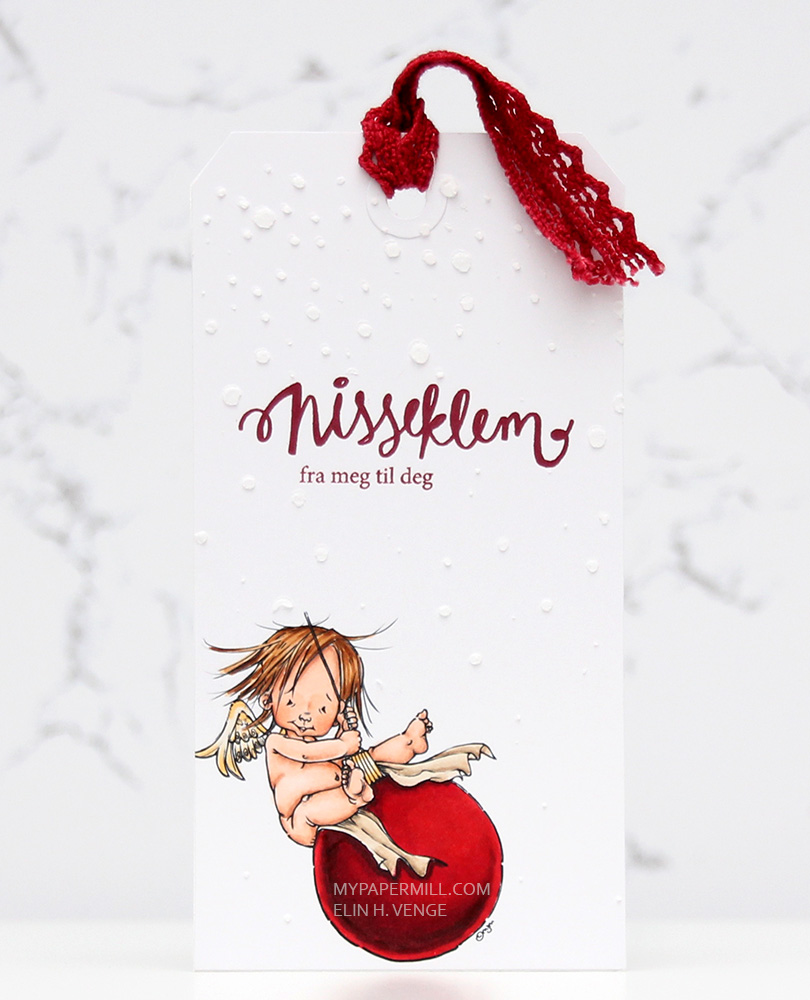
 Jeg fargela motivet med Copics, stanset det ut til en stor tag og maskerte motivet før jeg brukte en stensil og embossingpaste til å lage snøfnugg rundt. Nisseklem fra meg til deg er to sammensatte tekster fra Norsk Stempelblad AS, stemplet med Papertrey Ink Scarlet Jewel blekk. Jeg festet en liten bit rødt bånd i hullet på tagen – enkelt og greit.
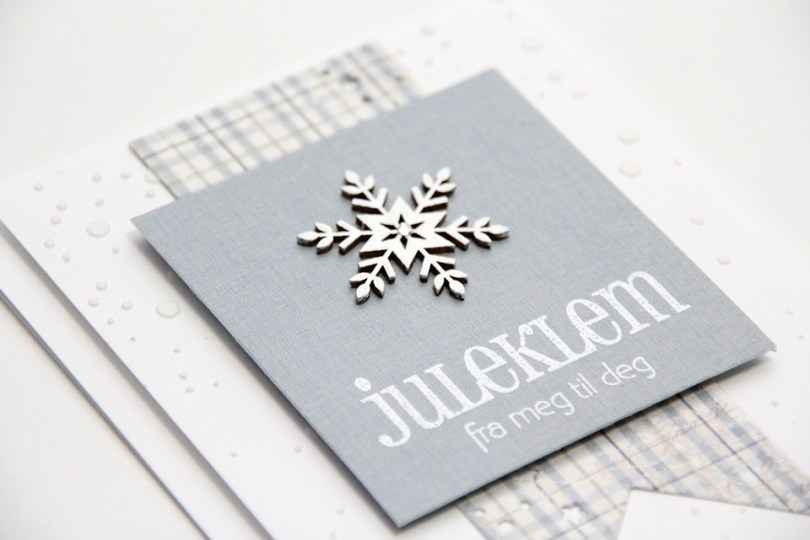
 Dette kortet er mitt første kort til artikkelen. Jeg valgte å lage alle kortene mine i A2-format. Jeg skjærte ned et panel så jeg fikk en 1/4″ kant rundt hele panelet, og brukte en stensil og embossingpaste for å få snøfnuggeffekten på bakgrunnen. Jeg stanset ut en vimpel av mønsterarket med en die fra Papertrey Ink og limte på.
 På en bit blå Maja-kartong stemplet jeg to tekststempler fra Norsk Stempelblad AS med VersaMark og embosset med superdetaljert embossingpulver fra Ranger. Jeg brukte det samme embossingpulveret til å få snøfnugget, som er en chipboard fra Snip Art, hvit. Jeg embosset snøfnugget i flere lag så jeg skulle få et jevnt, skinnende, hvitt lag på toppen. Til slutt limte jeg på en diamant fra Kort & Godt i midten av snøfnugget.
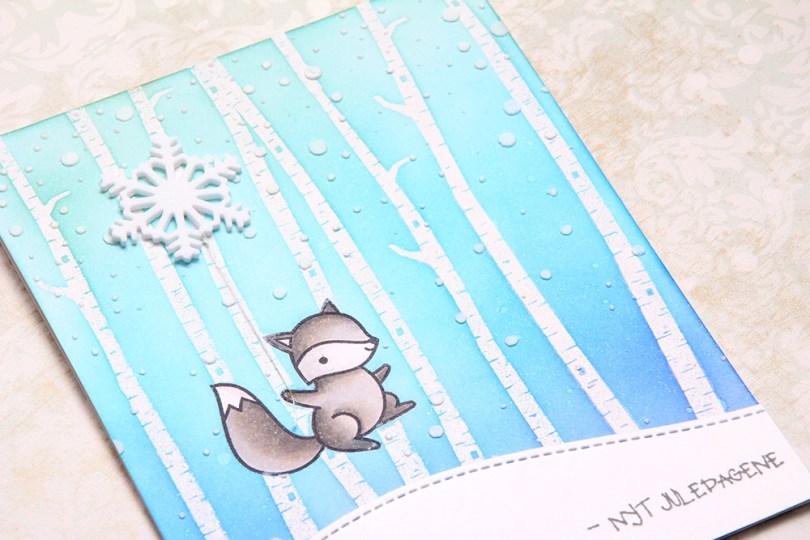
 Da jeg var ferdig med svertingen fant jeg frem et rent ark og strykejernet mitt, og fjernet embossingen ved å legge det rene arket over embossingen og så stryke. Varmen fra jernet gjør at embossingpulveret fester seg i arket, og motivet du ender opp med da er hvite trær med svertet bakgrunn, men uten embossingen. Alt blir en stor, glatt flate – det hele er litt magisk. Strykejern kan brukes til mer enn bare kjedelige saker!!

 Jeg svertet forskjellige farger Distress Oxide-blekk på en bit hvit kartong og lot det tørke (hjalp til litt med varmepistol, jeg er for utålmodig til å la det tørke på egen hånd). Jeg stanset ut panelet mitt med en sirkeldie fra My Favorite Things, stemplet en tekst fra Norsk Stempelblad AS med VersaMark og embosset med hvitt embossingpulver fra Ranger.
 For å gi litt interesse til bakgrunnen på mitt veldig enkle kort trykket jeg VersaMark gjennom en stensil fra Simon Says Stamp og embosset med iriserende embossingpulver fra JudiKins. Jeg limte tekstpanelet mitt på kortbasen med 3D-teip og satte på noen paljetter fra Pretty Pink Posh som en siste finish.
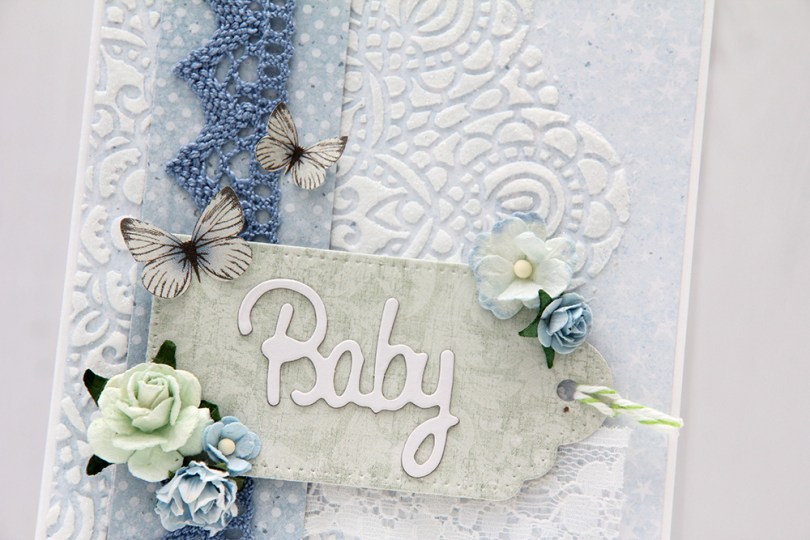
 Augustnummeret av Ett trykk var proppfullt av babyinspirasjon. Her er enda et av mine bidrag.
 Et kort med relativ få elementer, men det trenger ikke å være kjedelig av den grunn. Jeg har brukt en stensil fra Simon Says Stamp sammen med embossingpaste og embossingpulver på bakgrunnen for å pynte opp det lyseblå mønsterarket med stjernene litt.
 Jeg stanset ut en tag fra en rest av et grønt mønsterark fra Maja Design. Den er montert med 3D-teip for å få litt mer dimensjon før jeg pyntet med diverse blomster og noen sommerfugler klippet ut av mønsterark fra Pion Design. Det hvite Babyordet er tynn chipboard fra Papirdesign.
 På innsidene har jeg gjort det meget enkelt. Jeg har brukt den samme stensilen også her, men istedenfor embossingpaste har jeg brukt Spring Rain blekk fra Papertrey Ink til å sverte med. Jeg har stemplet en tekst fra Papirdesign på venstresiden, og det lille hjertet med føttene er også et stempel fra Papirdesign. Begge er stemplet med Blueberry Sky blekk fra Papertrey Ink, og de runde panelene er stanset ut med en die fra My Favorite Things og så satt på 3D-teip. De grønne stjernene er stanset ut med en Papirdesign-die.
 Baksiden har omtrent det samme oppsettet. Her syns svertingen gjennom stensilen litt bedre, og teksten som er stemplet her kommer også fra Papirdesign.