Hi, crafty friends. I’m usually pretty good at making Christmas cards all year. What I’m not usually so good at is creating Christmas tags to go on presents. It’s often one of those things I do last minute, even after the gifts are wrapped. I’m trying to be better, though, and today I have three tags to share featuring the Snow Cute stamp set from Lili of the Valley, I just can’t get enough of this set.
 These penguins are about 4 cm tall, which makes them the perfect size to create gift tags from. By stamping them on a sheet of X-Press It blending card (or your cardstock of choice) with a little bit of space between them, you can die cut some and fussy cut the remaining ones. I decided to fussy cut the one in the center, while using dies for the other two.
 I colored all the penguins with Copics and used a black glaze pen to create a little bit of shine and dimension to their eyes. Once the black was dry, which didn’t take long, I used a white Gelly Roll 05 on top of the black to put the white back into their eyes.
 I’m starting with this fussy cut penguin. In a drawer, I had a scrap of a snowy background that I created last fall using Rustic Cream cardstock from Papertrey Ink, the Falling Snow stencil from Simon Says Stamp, modeling paste from The Crafter’s Workshop and Rock Candy distress glitter from Ranger. I decided to put it to use and die cut it using the 210 die from Kort & Godt, I really like the heart shaped hole it creates at the top. I mounted the penguin using foam tape and added a sentiment strip below. The sentiment is from the Christmas Greetings stamp set from Lili of the Valley, it’s got heaps of great sentiments for the holidays. I used a bit of red lace ribbon, a couple of bells and a piece of thread to the top of the tag to embellish it a little.
 On the back, I added die cut letters to spell the words to and from. The words are from the Tag Builder Blueprints 6 die set from My Favorite Things, die cut from Amarena Cherry cardstock, also from MFT.
 Simple color palette for this one.
 Next up is the circular tag. I used the Tag Builder Blueprints 6 die set for this one as well, as well as another sentiment from the Christmas Greetings stamp set from LOTV. I added Divine Twine in the color Cherry to the top, a bell charm and a few red enamel dots from Papirdesign to finish it off.

On the back, I used the to/from circle die that I used for the first tag, but for this one, I used the negative of the die cut, popping in the centers of the o’s to complete the look. I figured it would be easier to see the writing on white cardstock instead of the red in the dim light on Christmas Eve when we open our presents, so this is meant to be practical too.
 A few additional colors for this one, I wanted to ground my penguin and also needed some color on that candy cane.
 For the blue one, I used the Fold-Up Tags die set from My Favorite Things to create my tag. I made sure not to cut off his scarf by fussy cutting that and putting it behind the die as I ran it through my die cutting machine. I used a piece of Blue Breeze cardstock from My Favorite Things to create the reinforcing element near the top, added some Divine Twine in the color Blueberry, a couple of white bells from UiT Hobby and some thread that’s actually meant to use with a loom (it’s super strong). Once again, I used the Christmas Greetings stamp set for the sentiment, and scattered a few snowdrift sprinkles from Little Things from Lucy’s Cards to finish.
 On the back, I used that same die from the Tag Builder Blueprints 6 die set from My Favorite Things that I used for the other two tags, this time die cut from Enchanted Evening cardstock from Papertrey Ink.
 Once again, simple color palette. These were such fun to make. I want to make more, and have a bunch on hand when it’s time to wrap Christmas presents, so I’m not rushing last minute to get the tags done.

 I colored the cow with Copics, before fussing cutting it, leaving a white trim around the edge. Onto a top fold fold card base, I ink blended blue inks from Altenew (Winter Lake, Icy Water and Polar Bear) through the Geometric Landscape stencil, also from Altenew, before stamping a Happy Birthday background stamp from My Favorite Things on top, using the darker two of the inks I used for the blending. I also used the stencil in the top right corner and used what was left on my ink blender brush for a soft look.
 I added Light & Fluffy modeling paste from The Crafters Workshop through the Tiny Clouds stencil from My Favorite Things. I wanted dimension to my clouds and put down a very thick layer of the paste. While that dried I worked on the rest of the card. I die cut four polaroid framed using the Precious Polaroids die set from My Favorite Things and stacked them for dimension. Onto Grapefruit cardstock from Concord & 9th, I stamped and white heat embossed three sentiments from the Bitty Birthday Wishes stamp set from My Favorite Things and cut them all down to strips, adding a few extra layers of cardstock behind each for dimension. I adhered the polaroid frame to my card base at an angle, glued the cow on top, added my sentiment strips and finished off with sequins and gems from the Christmas in your heart mix from Streamside Studios.
 Super simple and very neutral color palette for this one.
 I colored my snowman with Copics, added black Glaze to his eyes, then a white dot using a Gelly Roll 05 once the black was dry. I also used the white to add the white dots to his hat. I fussy cut my snowman, leaving a thin white trim around him, before putting him to the side to work on the rest of my card. I covered my card base with patterned paper from Maja Design. This frosty blue paper is from the Vintage Frost Basics collection from 2013, the sheet’s called 13th of December. I used the Notebook Edge die from My Favorite Things to create a fun border on a piece of Stamper’s Select White cardstock from Papertrey Ink. I used Light & Fluffy Modeling Paste from The Crafter’s Workshop to create snow through the Falling Snow stencil from Simon Says Stamp. While the paste was still wet, I sprinkled on Rock Candy distress glitter for an even frostier effect, and mounted my white panel with foam tape to my card front.
 I stamped and white heat embossed a sentiment from the
  Simple color palette for this one. Lots of blues.
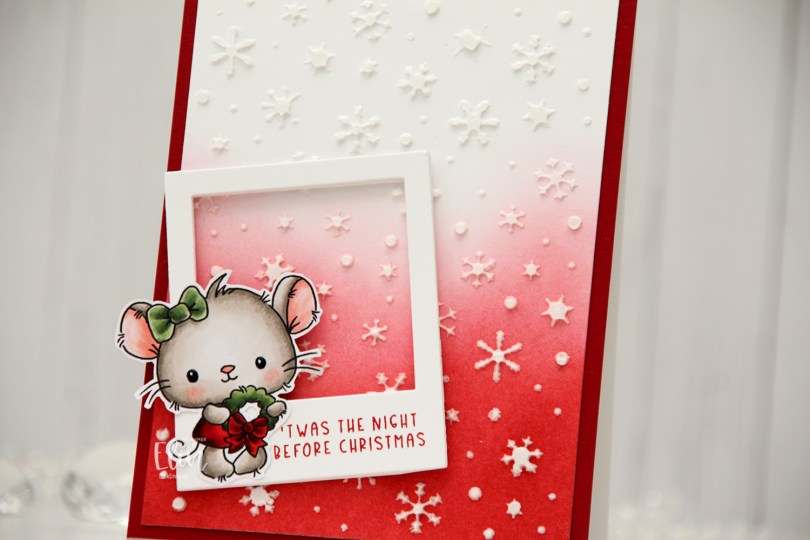
 I colored the mouse with Copics and fussy cut her, leaving a thin white border. I used a black Glaze pen to create some shine in her eyes, and once the black was dry I added a dot of white using a Gelly Roll 05.
 Onto a white cardstock panel, I ink blended Amarena Cherry and Wild Cherry inks from My Favorite Things for an ombre effect. I then used a die cut as a stencil to add some snowflakes to the background with modeling paste from The Crafter’s Workshop. The die I used to die cut the makeshift stencil is the Snowflake Confetti fancy die from Hero Arts, which is one of my all time favorite Christmas/winter dies.
 I cut the ink blended panel down a little and adhered it to a panel of Amarena Cherry cardstock from My Favorite Things that covers the front of a top fold white card base I created from Stamper’s Select White cardstock from Papertrey Ink.
 From white cardstock, I die cut the Polaroid Shaker Frame die from My Favorite Things five times for a stacked look, stamping a sentiment from the Christmas Greetings stamp set from Lili of the Valley to the top layer using Amarena Cherry ink from My Favorite Things. I added the cute little mouse on top of the frame, and my card was complete.
 If you look closely, you can see the shine in the eyes in this photo.
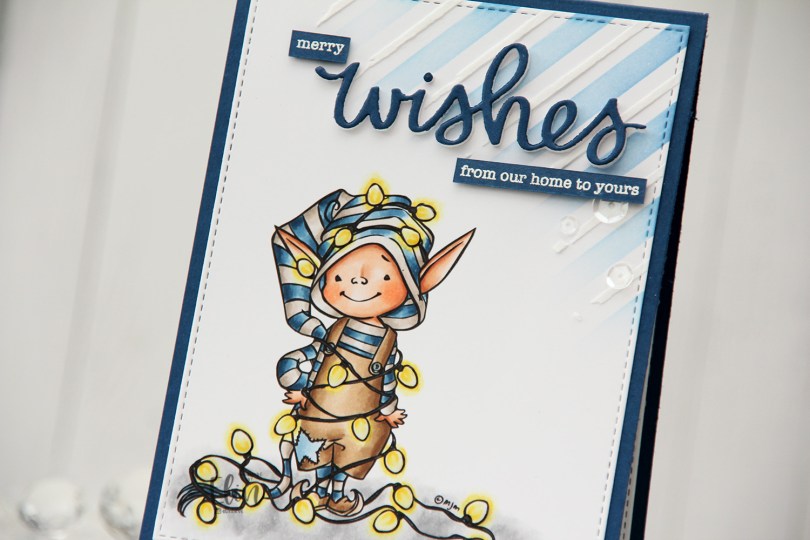

 I had to go for my traditional Christmas colors for this one with blue, brown and grey, it’s such a good combo. I made all the lights the same color. I know some people prefer the differently colored lights, but as a Scandinavian minimalist, my color palette for Christmas is very toned down, including my Christmas lights, which are all white.
 Once I’d colored my image, I used the largest die in the Stitched Rectangles STAX 2 set from My Favorite Things to create a faux stitch border around my panel. I then took the Plaid builder stencil set from My Favorite Things and ink blended using Blue Yonder ink from My Favorite Things in the top right corner with the stencil with the wide stripes. On top of the stencil with the smaller stripes, I used Light & Fluffy Modeling Paste from The Crafter’s Workshop for a little bit of added dimension and interest to the background.
 I adhered my panel to an A2 top fold card base I created from Enchanted Evening cardstock from Papertrey Ink. Using the scripty wishes die from Mama Elephant, I die cut three layers of white and one blue on top for a stacked look and adhered it on top of my stenciled background. I also stamped and white heat embossed a couple of sentiments from the Holiday messages stamp set from Mama Elephant to add to the wishes to make my sentiment complete. I cut them down to strips and added a few layers of cardstock behind each of them for dimension, before finishing off the card with a few sequins from the Starry Night mix from Little Things from Lucy’s Cards, as well as Glossy Accents for the lightbulbs.
 I love the glow and shine from the lightbulbs.
 Fairly simple color palette for this one.
 I started with a quarter sheet of Stamper’s Select White cardstock, the Wintry Forest stencil set from Pinkfresh Studio and the Northern Shore color family from Altenew. The stencil set has 6 different stencils that you layer to create a gorgeous wintry forest. I started with stencil number 1 (the Pinkfresh Studio stencils are numbered, which makes it really easy) and Polar Bear ink, which is the lightest of the four colors in the Northern Shore color family. I then moved on to stencil number 2, but didn’t change the color. Since I had to stretch my four colors and use them on five stencils (the last stencil adds snow on the trees), I kept the lightest one for this second layer and ink blended with a heavier hand, which makes the color appear darker. I used stencil number 3 with Icy Water ink, which is the next shade, then stencil number 4 with Winter Lake ink, and finally stencil number 5 with Arctic Mountain ink, which is the darkest color in this set of four gorgeous blues.
 On top of the ink blending, I stamped a snow flurry background stamp from Kort & Godt (M-428) using Fresh Snow hybrid ink from Papertrey Ink, which added lots of white snowy dots to my background. I then used a die in the DIE240 set from Kort & Godt to die cut the banner directly from my background. I put it to the side, placed the last stencil on my background and spread a layer of Light & Fluffy modeling paste from The Crafter’s Workshop through the stencil, before sprinkling on Rock Candy Distress Glitter and let that dry. Onto my banner, I stamped a sentiment from the M-467 stamp set from Kort & Godt using Arctic Mountain ink. I ink blended a little bit of Winter Lake ink to the edges to make it stand out a little bit more, added a stack of white die cuts behind it for dimension and adhered a couple of faceted iridescent pearls (ST178) to finish off the card.
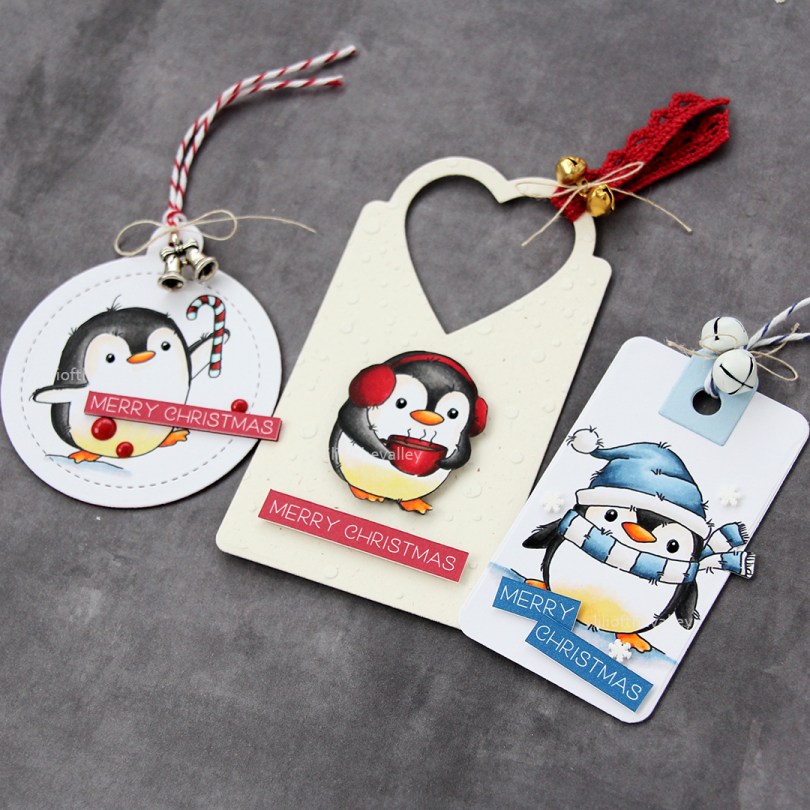

 I can’t resist a good penguin, and the
  Last fall, I made a bunch of snowy backgrounds using an old Falling Snow stencil from Simon Says Stamp, some modeling paste from The Crafters Workshop and Rock Candy Distress Glitter for some sparkle. If you sprinkle on the glitter while the paste is still wet, it will adhere nicely. I didn’t use all my backgrounds last year, and dug this one out of a drawer in my craft room. The cardstock is Rustic Cream from Papertrey Ink, which is a nice cream color. It’s got the right amount of color to let the falling snow show without being too distracting. It also has these little flecks of darker color here and there, giving it a rustic feel, it’s really nice.
 I adhered my snowy background to a top fold card base I created from Amarena Cherry cardstock from My Favorite Things, before die cutting the word MERRY (Stacked Merry die from My Favorite Things) four times from Classic Kraft cardstock from Papertrey Ink, which I stacked and then adhered to the snowy background using liquid glue.
 I put foam tape behind the penguin and added him to the card, before using one of the words from the
  I used a black glaze pen to add shine and dimension to the penguin’s eyes. Once the black was dry, I added a dot of white Gelly Roll 05 over the top.
 These penguins are quick and easy to color and don’t require a whole lot of markers.
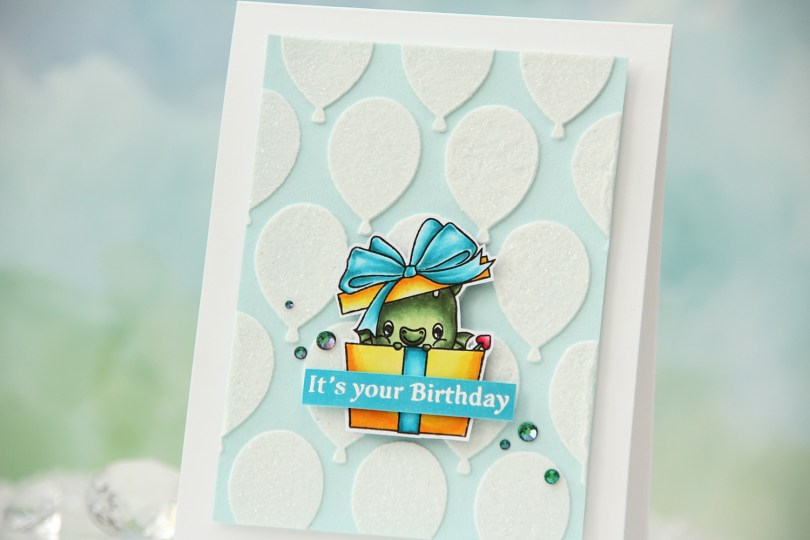
 I used one of the dragons in the
  I fussy cut around the image leaving a thin white border. There’s a set of coordinating dies to go with the stamp set, but I don’t have it, and fussy cutting this one was simple enough.
 I added a thick coat of modeling paste through the
  Using 1/16″ foam squares, I added my colored dragon towards the bottom center of the card. I added a little bit of liquid glue to make sure it really adhered to my glitter balloons, I didn’t want it coming off at any point. I didn’t have the right shade of cardstock to match my tealy blue coloring, so I colored a scrap strip of X-Press It blending card using one of the markers I used for the bow, before stamping and white heat embossing a sentiment from the Flamin’ Birthday stamp set. I cut it to fit the sentiment, added a couple of strips of cardstock behind it for dimension and stability and adhered it to the present.
 I finished off the card by adding a few sparkle gems. These are from the
 The process for creating this one was identical to the first ones I shared in
  There’s lots of texture and visual interest on this tag because of all the layers of paper, the foam tape to add dimension and the stenciled background. The accessories on the snowman are in a brighter green color than everything else on the tag, which still makes him stand out against the other elements.
 For the back of the tag I used a couple of stamps from Inkido, as well as more of the white heat embossed sentiments from Norsk Stempelblad that I created lots of in one of my compartmental crafty sessions. These tags were heaps of fun to put together like this.
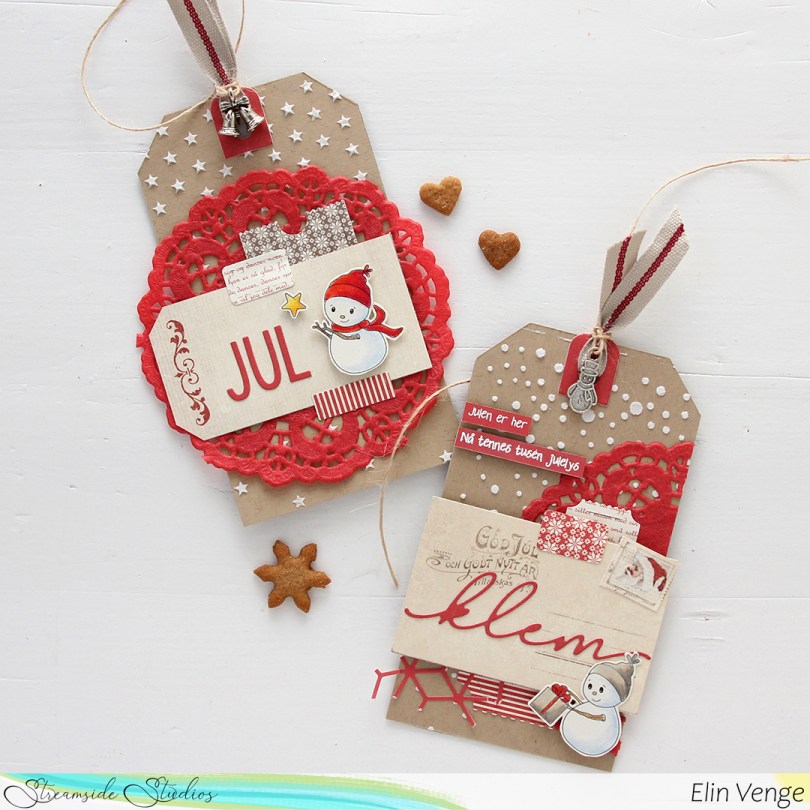
 For these tags, I chose red instead of green. I planned ahead and colored some of the snowmen with green accessories, and some with red. For one of these tags I used the Falling Stars stencil from Simon Says Stamp, and I thought it was fitting to add the snowman with the star for that particular tag.
 A lot of elements are the same on these two tags as the first two; patterned paper from Pion Design die cut using the Happy Days Ticket Stubs die from XCut. I also used the same die from Altenew that I used with the green cardstock on this one, and it’s a nice added element that doesn’t have the perpendicular angles than many of the other layers do, so it breaks up the monotony a little and adds interest. For the tag with the stars, I used the word JUL from the Gledelig jul die from Kort & Godt, and for the tag with the Christmas present, I used the word klem from the Juleklem die, also from Kort & Godt. I added red paper doilies from Papirdesign to the base of these tags, it’s a nice foundation to put everything else on top of.
 The backs of these are pretty similar to the backs of the green tags I made. I used the same 24.12 stamp from Inkido and the same stamps from the Distressed Patterns stamp set from My Favorite Things, but changed the ink color to Pure Poppy ink from Papertrey Ink.