Hi, everyone. I’ve got a birthday card to share with you today, but it’s not in my usual clean and simple style, it’s a more layered card. I used to make this kind of card all the time when I first started making cards, and it’s what I feel I have to go back to whenever I get an order for a card. It’s a good way for me to justify the price I set.
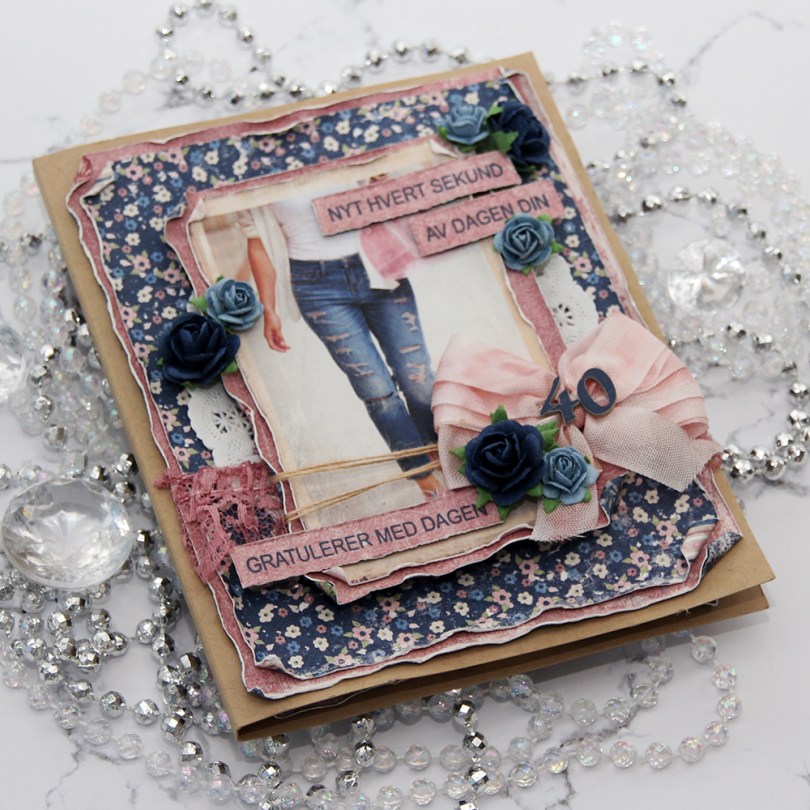
 I was told that the birthday girl likes blue, pink and flowers. I knew just which papers to dig out from my stash. The paper I’ve used here is all from the Denim & Girls collection from Maja Design. I love their collections, the patterns are nice and small and the colors to die for. I mean, look at those blues!!! Amazing!!! I’ve predominantly featured two sheets on this card; Summer outfit (which is the blue with the flowers) and Romantic blouse (the pink one). The image comes from the Snapshots sheet.
 I started by cutting down the patterned paper to the sizes I wanted, before using a paint brush with clean water to wet all the edges. This makes the paper more pliable, and I can curl the edges with my fingers, giving the paper some dimension and interest. The cool thing is that when it dries, it stays like that, it’s very sturdy. With Maja Design patterned paper it’s extra sturdy, because the paper is so thick you can actually use it for card bases. It’s really nice.
 I added a paper doily, some pink lace, some May Arts natural twine, a bow, a couple of diecut numbers and a few paper roses from Papirdesign, in addition to a couple of sentiment strips. I stamped the Mathia design sentiments straight onto the pink patterned paper using Enchanted Evening ink from Papertrey Ink, distressed the edges of the strips slightly with a finger nail and mounted them on foam tape. The top sentiment translates to “Enjoy every second of your day” and the bottom one says “Happy birthday”.
 When creating this type of card I go all out and decorate all four sides of my card. I used the same layout on the insides, but skipped all the embellishments. The kraft panels are actually removable. I added double sided tape to the back in generous amounts, but left the release paper on, and glued the panels on using just a glue dot. Glue dots are a nice temporary solution, and it enables you to pull the panels out fairly easily, write your personal message, remove the release paper from the double sided tape and glue the panels back where they belong. It’s a great way to not have to write inside a bulky card.
 I had to decorate the back, too. I just had to. Same basic layout on the back. Not as heavily embellished as the front, also not as bare as the insides. I stamped a birthday sentiment from Norsk Stempelblad AS using the same color ink as the sentiment strips on the front, and added a few blue roses to finish the card.
 With cards this thick, they don’t fit in regular envelopes, so I usually make simple envelope boxes to match. This one is 1″ high, and it actually could have been a little higher, it was a little bulgy when the card went in. I diecut the blue patterned paper with a Simon Says Stamp label die and added pink diecut letters from Scrapmagasinet to spell the name of the birthday girl. I did two layers so the name wouldn’t get completely lost with that busy background.

 Another Wednesday, and another Mo Manning creation. I’m trying to be better at using all the different images I have from Mo’s Digital Pencil, and I’ve kind of started at the beginning of the alphabet when coloring up previously unused images. I colored up this one for Kathy Racoosin’s 30 day coloring challenge back in June 2018, so it’s about time
  This isn’t exactly the easiest image to add to a card. I decided to stamp and heat emboss a couple of sentiments from a Huldra designstudio stamp set. The top one says Good luck… and the bottom one says “with new challenges”, which I thought was very fitting with the image. That red cardstock is Pure Poppy from Papertrey Ink, and I added foam tape behind both strips to create a little bit of dimension.
 I added the colored image to the center of the card front and a strip of Kaisercraft patterned paper (P214 Periwinkle) on either side. I topped everything off with a few blue enamel dots from Papirdesign.
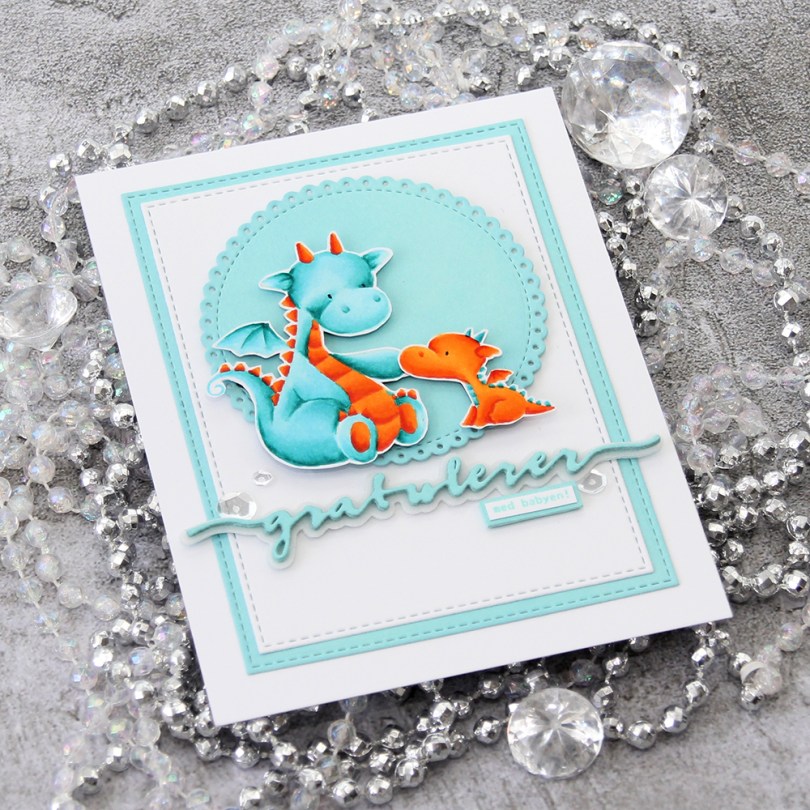

 I’d already fussy cut my dragons, but I used the Stitched Rectangles STAX sets (both sets, actually) to create my little frame, and glued them both straight onto my card base. I also diecut a scalloped eyelet circle using a CottageCutz die and mounted it on thin, black foam tape from Gina K. Designs for a little bit of dimension. I used the same foam tape on the back of my dragons and glued them to the circle. I created a stacked diecut sentiment using dies from Papirdesign and stamped a small sub sentiment from Norsk Stempelblad AS using Hawaiian Shores ink from Papertrey Ink. I embellished very simply with some sequins from Pretty Pink Posh, and that finishes my card.
 I colored up this image from the Sending Sweet Celebration Wishes for day 8 of the last round of Kathy Racoosin’s 30 day coloring challenge on Instagram. I’m not usually good at turning images from that challenge into cards, but I’m trying to be better. I decided to fussy cut this one and put him on a vellum circle.
 I followed a sketch from MFT and glued a piece of patterned paper from Sunny Studio onto my cardbase, before cutting a white cardstock piece from Papertrey Ink on an angle and adding lots of foam adhesive on the back. I am not shy with my foam adhesive, I tend to cover the entire back, which I did this time as well. I stamped a sentiment from the same stamp set in VersaFine Onyx Black ink. I like the color and the crispness of this ink, but am no fan of that hinged lid, it’s a pain to work with.
 I glued my vellum circle to the white cardstock (I put my liquid glue strategically behind the bunny) and added a couple of Papirdesign enamel dots for a finishing touch.
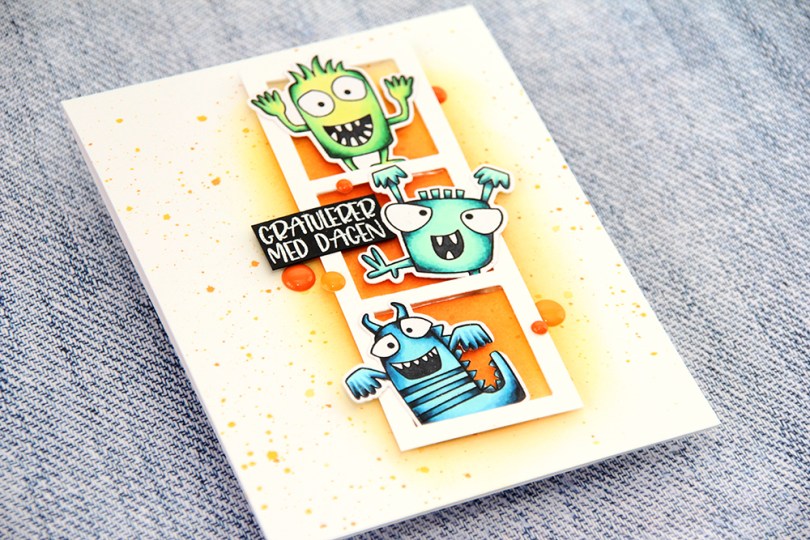
 This card was a bit of an evolution. You might even call it remotely controlled cardmaking. I’ve been coloring so much lately, but not made a lot of cards, so I was really unsure of what to do when I sat down to create this.
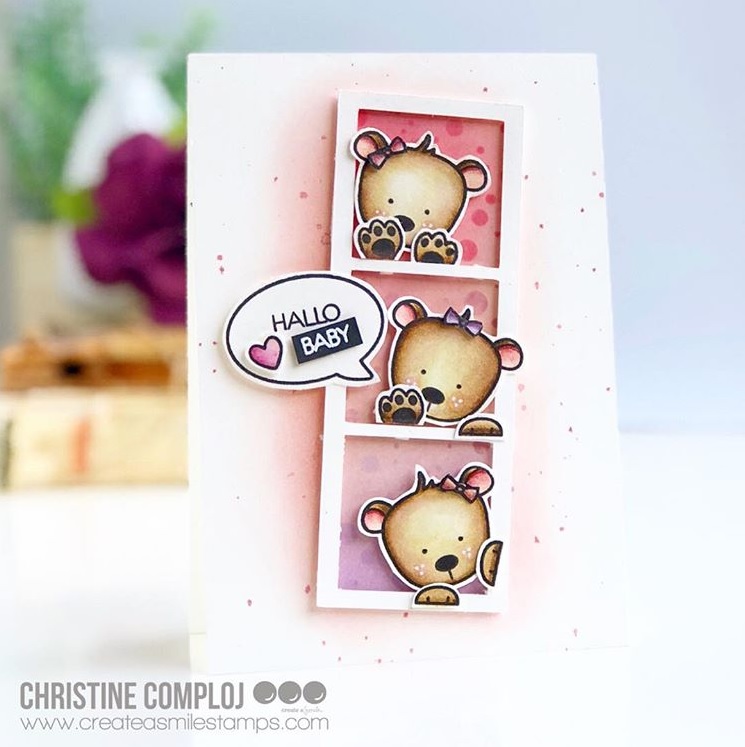
 The first decision was to diecut those monsters from My Favorite Things. I usually like fussy cutting, but Liz decided that diecutting was the way to go with this one. She pretty much ran the show, I just did as she asked. I made my little frame and decided where it needed to go before going in with orange and yellow inks on the cardbase.
 I had four monsters, so Liz urged me to put the last one on an ink blended circle on the inside. I asked her if she wanted paint splatters on the inside too, before I removed my circle mask. She wanted water splatters, so I added water splatters. I had a great time being remote controlled by her!
 The sentiment (by Mathia Design) was a story in an of itself. By the time I got that far, I was super tired, so I struggled to decide where to put it. My “remote control” had also run out of batteries at that point, so I needed to sleep on it. This morning, it was a lot easier to decide. I added a few enamel dots close to the frame, and that finishes off my card. Or our card, I should say, I probably wouldn’t have gotten this done if it weren’t for Liz helping out!
 I colored up
  I used a Docrafts die to create those tickets from scraps of patterned paper from Maja Design, popping them up on foam squares from Gina K designs to give them a little bit of dimension. I white heat embossed a sentiment from Ladybug & Friends on one of the tickets and tucked a diecut pine branch behind it. I finished by adding a few red enamel dots from Papirdesign, tying in the red details from the colored image.
 As usual, I finish with the Copic colors I used to color my image.
 I colored her up with my Copics, focusing on the RV90s that go so incredibly well with the patterned paper from Papirdesign that I used, it’s ridiculous!
 I made a shaped card using the third largest die in the XXL Square Frames Frilly #10 set from GoKreate, and did a whole bunch of diecutting elsewhere on the card too. To break up the monotony of a diecut on top of a slightly larger diecut on top of a slightly larger diecut on top of a slightly larger diecut, I cut some Kort & Godt lace and put it across the card. The diecut heart banner, the word banner and all those Wild Orchid Crafts flowers also help. The flower berries and pearls are from Kort & Godt.
 There’s a banner hidden behind that image, diecut with a Magnolia die. I tied a bow of seam binding ribbon with the help of a DIY bow easy, I can’t make nice bows for cards to save my life (true story!), so the Bow Easy helps. I stamped a Papirdesign stamp using Memento Sweet Plum ink, which also matches the patterned papers beautifully. On top of the bow I added an old button from Melissa Frances.
 Is that an adorable little fairy or what? Those flower berries from Kort & Godt are really old, I think they might actually be from their first production of flower berries. They made some later on that had more of a greenish yellowy tint, but these are more creme colored and perfect for this card. I still have a few left, I only use them on very special cards.
 I added another Papirdesign sentiment stamp on the back of the card, along with a few more flowers. I removed the centers of the sweetheart blossoms and added back in some purple pearls from Papirdesign that once again matched the colors of everything else.
 As you can see from the above photo, this is a very dimensional card and not at all mail friendly, it’s super thick.
 Not too many Copics used for this one. Probably because it’s mostly that one dominating color.
 I dag slår jeg et slag for alle småstemplene. Ofte i et stempelsett finnes det i tillegg til de litt større stemplene noen mindre som fyller ut plassen på stempelplaten. Disse blir ofte glemt, da vi gjerne kjøper stempelplatene for de store stemplene. I dag har jeg brukt flesteparten av småstemplene i et stempelsett fra Pretty Pink Posh og stemplet dem over hele fronten av kortet mitt.
 Å stemple såpass mange stempler tar litt tid. Ikke bare skal de stemples, men for at det hele skal se litt vilkårlig ut til slutt stemples de ikke i noe mønster, og hvert stempel må derfor plasseres på nytt for hver stempling. Jeg brukte vel omtrent en time på å stemple alle disse småstemplene, før jeg fargela dem med Prismacolor-blyanter.
 Jeg prøver så godt jeg kan å bruke rester av mønsterark på kortene mine, så her fant jeg noen Maja Design-rester i farger som matchet fargeleggingen min. Det rødstripete er fra Home for the Holidays-kolleksjonen, mens det øverste er fra Vintage Frost Basics-serien, som kom ut helt tilbake i 2013. Jeg er jo ikke akkurat kjent for å være den som bruker mest ark på kortene mine, så det minker ikke så fort av restelageret, men litt og litt er bedre enn ingenting.
 Jeg brukte et
  Jeg avslutter med fargene jeg har brukt. Veldig uvant å bruke Prismacolor-blyantene mine istedenfor Copics (tregere går det selvfølgelig også), men jeg prøver å bli flinkere til å bruke det jeg har, og det er jo litt synd om de bare blir liggende i en skuff uten å bli brukt, ikke sant?
 Jeg brukte rester fra en gammel serie fra Pion Design til å kle eksplosjonsesken min. Serien er Grandma’s School Book, og jeg brukte dies fra Cottage Cutz til å lage sirklene på toppen, og pyntet enkelt med kirsebærblomster fra Papirdesign og pyntegrener fra Kort & Godt.
 Sidene på boksen er hylser til skuffer, og skuffene har jeg dekt i bunnen med mer mønsterark. I midten av bunnen har jeg stemplet en tekst fra Kort & Godt med Memento Espresso Truffle. Enkelt og greit.
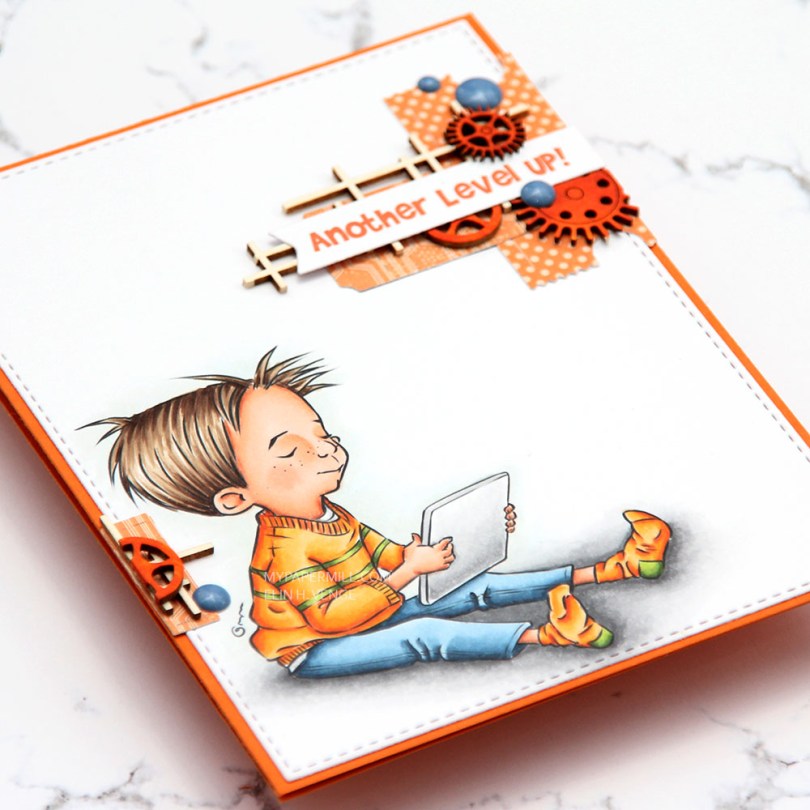
 I decided that
  I don’t really know how I ever survived without the stitched rectangles sets from My Favorite Things. I use the largest in the 2 set for pretty much every card I make. It creates a nice 1/16″ border around my panel, which, to me, is the perfect width. I used another MFT die for the sentiment banner. It’s from the Fishtail Flag Frames set, another set I use a great deal. MFT has some very versatile dies! For the actual sentiment (which is a digital sentiment that comes with the image) to be the right color I put a scrap piece of the orange cardstock into my scanner, opened the scanned image in Photoshop, used the eyedropper tool to choose that color, and changed the color of the sentiment before printing.
 I’ve set myself a challenge to see how far I can get this year by only using scraps of patterned paper and not digging into new ones. Design team contributions for Hobbykunst get to be exempt from my little experiment, but I think I can make it pretty far with just scraps. It helps that I tend to make cards like this, that don’t require big chunks of patterned paper. The orange one with the dots is from a pack of digital patterned papers by Cathy Zielske that I bought years ago, and the other one is actually from a Halloween collection from Papirdesign. I diecut them both with a die from Xcut that diecuts lots of tickets from one die. I put a chipboard piece from Snip Art on top of my tickets, and a sentiment banner straight on top of that. By using the chipboard, I get dimension without having to resort to foam tape, which is always a plus.
 I felt like I needed a little bit towards the bottom, too, so I added another small ticket, another uncolored piece of Snip Art chipboard and half a colored gear, as well as a blue enamel dot from Papirdesign. It’s amazing how much you can fit into such a small space if you just stack it.
 I have found that my blues look better if I skip B93 and jump straight from B95 to B91. Have you made a similar discovery? I’d love to hear about it.